My Holiday Mantel | How To Get That “Wow” Full-Garland Look
I love a really full mantel garland. This year I tried a new way to assemble and hang it. Read on to learn how to take your garland from blah to wow!
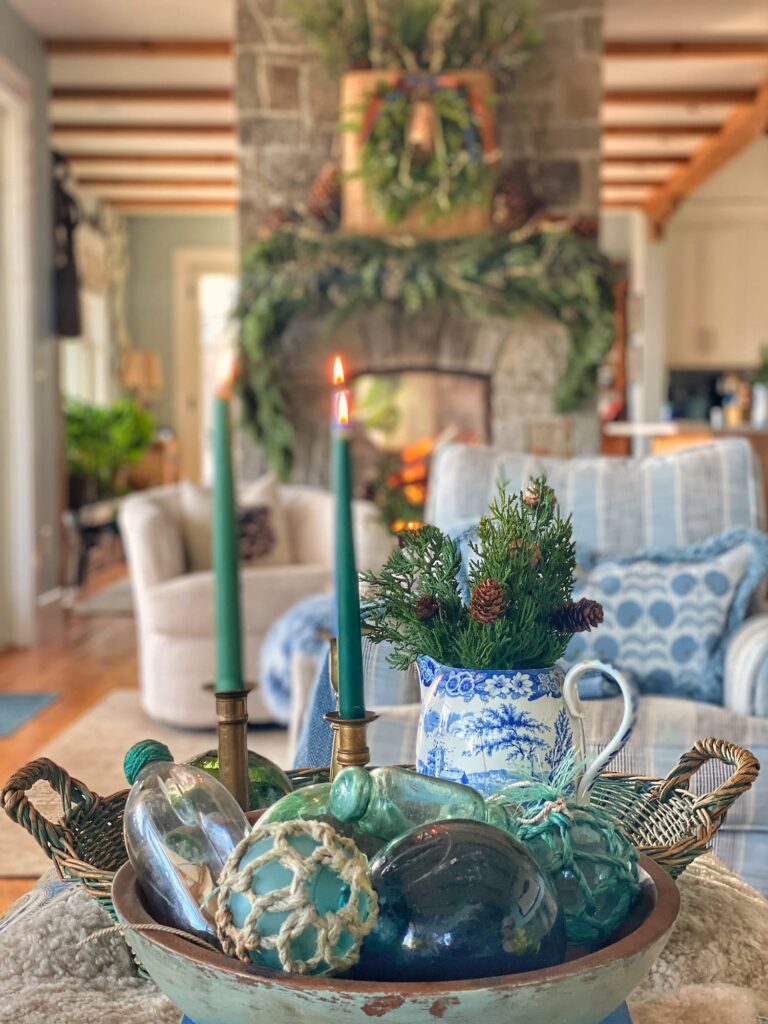
This Year’s Holiday Mantel
I started working on my blog post for this week on Thursday.
I was going to share my Christmas trees, so I spent the afternoon getting the tree in the guest cottage set up and taking pictures of this year’s three trees.
In the evening I began the actual writing.
And then that night I switched gears to finish pulling my living room mantel together.
I have been all over the place like that with my decorating this year….
This year I decided to try a new technique to assemble and hang the garland that I learned from my friend Suzanne, @suzannezinggstyle on Instagram. Suzanne creates the most spectacular mantel garlands, as well as beautiful table settings and seasonal displays. Her home is more formal than mine, but I thought the method she uses would translate well to my rustic style too.
So I got to work at around 9:30 at night…
You know where this is going, right? Do you find yourself faffing and fluffing your house into the wee hours this time of year?? That is often when my creative juices start to flow, for some reason.
At first it was rough going, and I thought about stopping and trying again the next day. But then I got into the groove and it all came together.
Around midnight.
But I LOVE how it turned out!
And I decided I needed to share this with you immediately in case you are still working on your mantel and want to give it a try.
So read on to discover what this garland trick is!
Garland Supply List
To get a really full garland here are the supplies you need:
- 1 or more cheap bendy garlands: These are used for the base. I got mine at Walmart for a couple dollars.
- 3 or more high quality garlands: These are the garlands you will see. What you choose is a matter of taste and the look you are going for. I wanted a natural rustic look, so I used two plain garlands I had from Walmart and one embellished with blue berries and pinecones that I found at HomeGoods last year. I shared some sources for garlands in my post Planning My Holiday Home Part 1 | Greenery and Decor .
- Greenery picks and other embellishments: Again, these can be different for everyone. Suzanne uses everything from ribbons, large florals, and ornaments to simple greenery picks. I was going for a natural look, so I used pieces of cut up garlands and foraged branches. Yes, branches. You know me!
- Nails or Command hooks
- Floral Wire: This is to attach the garland. Some people also use pipe cleaners (green or brown to blend in). And I know someone who swears by zip ties for her mantel garlands.
- CHICKEN WIRE!: This is the key to Suzanne’s bold garlands. It is what you secure everything to. I ordered mine from Amazon, but you can probably get it at Lowes, Home Depot, or your local hardware store. Bonus — it can also be used for floral displays. Can’t wait to try that too!
Are you ready to get hanging?
Assembling and Hanging the Garland
Here are step-by-step instructions to assemble and hang your garland
1. Attach the nails or Command hooks to your mantel.
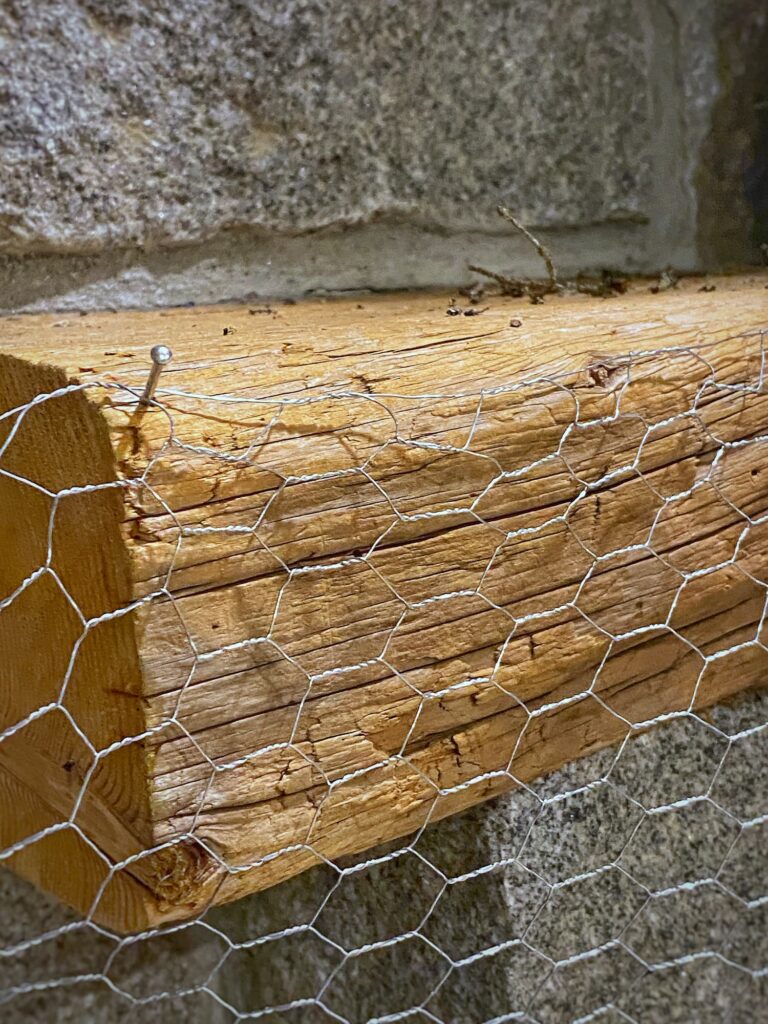
My mantel is a rustic beam, so I just hammer nails into it. I used a total of 5 nails to support the garland. I would say better safe than sorry in this situation. You don’t want the whole thing to come crashing down.
2. Cut a piece of chicken wire the length of the mantel and hook the chicken wire over the nails or hooks.

I used wire cutters to cut the chicken wire. Be careful, the cut edges are a little sharp and tend to catch on things. Don’t worry if it the chicken wire hangs down too far. You will trim it once you are done.
3. Attach the bendy garland to the chicken wire by using the little branches like a twist-tie.
I only used one of these garlands, but in retrospect, I think it would have been easier to use one bendy garland for each quality garland. (Three in my case.) I will explain my reason why in step 5. Let the bendy garland hang down on either side. (I like a slightly asymmetrical drape.)
4. Again, using the bendy garland branches like twist-ties, attach the first quality garland.
I did this in two pieces so that the garland would hang with the branches facing down on each side.
5. Attach the other quality garlands using floral wire or the bendy garland.
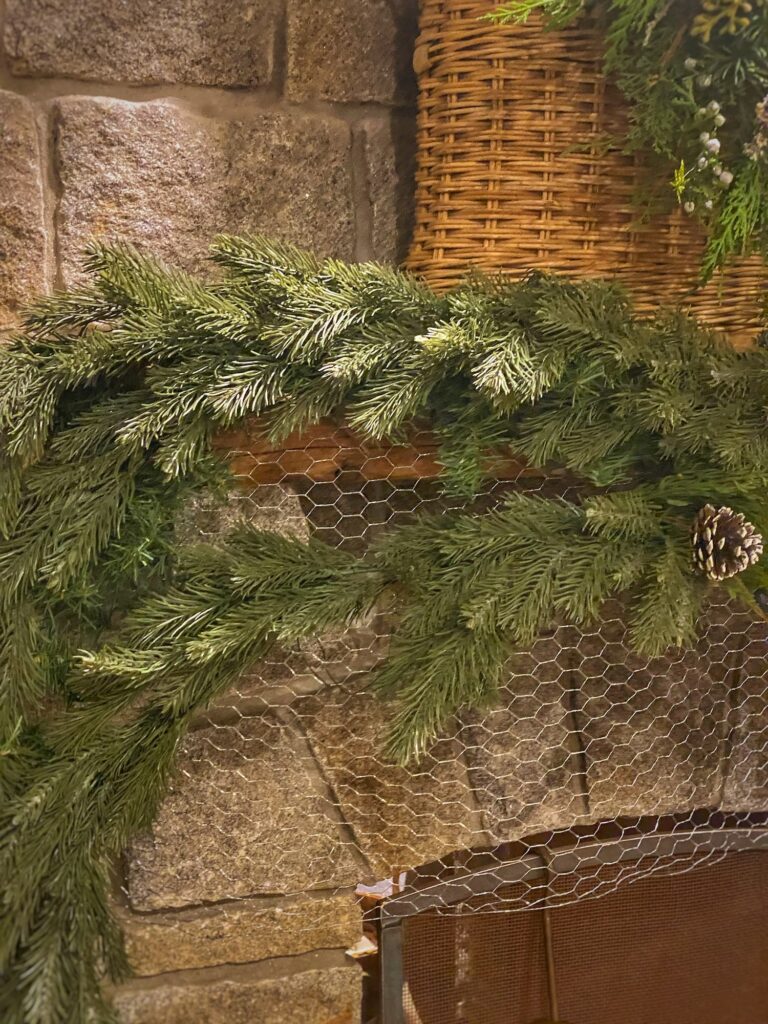
I attached my other two garlands using floral wire. I found it a little tricky looping the wire back through the chicken wire and around the garland. The bendy garland is so much easier! Plus, it seems more secure and also creates a good green base for the garland. I placed the plain garlands on the top and bottom and then the embellished one in the middle, sort of layered over the other two.
6. Cut off the excess chicken wire and tuck in any pieces that are showing.
7. You are done with your garland base! Now for the fun part!
Add-ons
It is time to get really creative!
First, step back and take a look at your garland.
Fill in any holes or thin spots with extra pieces of garland. You probably won’t need to attach these with wire, just push them into holes in the chicken wire.
Continue to do the same with other embellishments.
I used pieces of a juniper garland I cut up. I love the light blue berries!
Then I added my favorite lichen-covered branches I forage in the woods here. Again, I just wedged these into the holes in the chicken wire.
Keep going until your garland is as simple or elaborate as you want!
This was my first time using this technique, so I didn’t try anything too fancy. Another time I might go for a swag, add more vertical pieces, or maybe something a little more dramatic on either end. For now, though, I am perfectly happy with my full natural-looking garland.
Here is a link to Suzanne’s tutorial saved to her story highlights on Instagram. You will definitely want to check out Suzanne’s IG page. She is so incredibly creative!
The Rest of My Mantel Decor
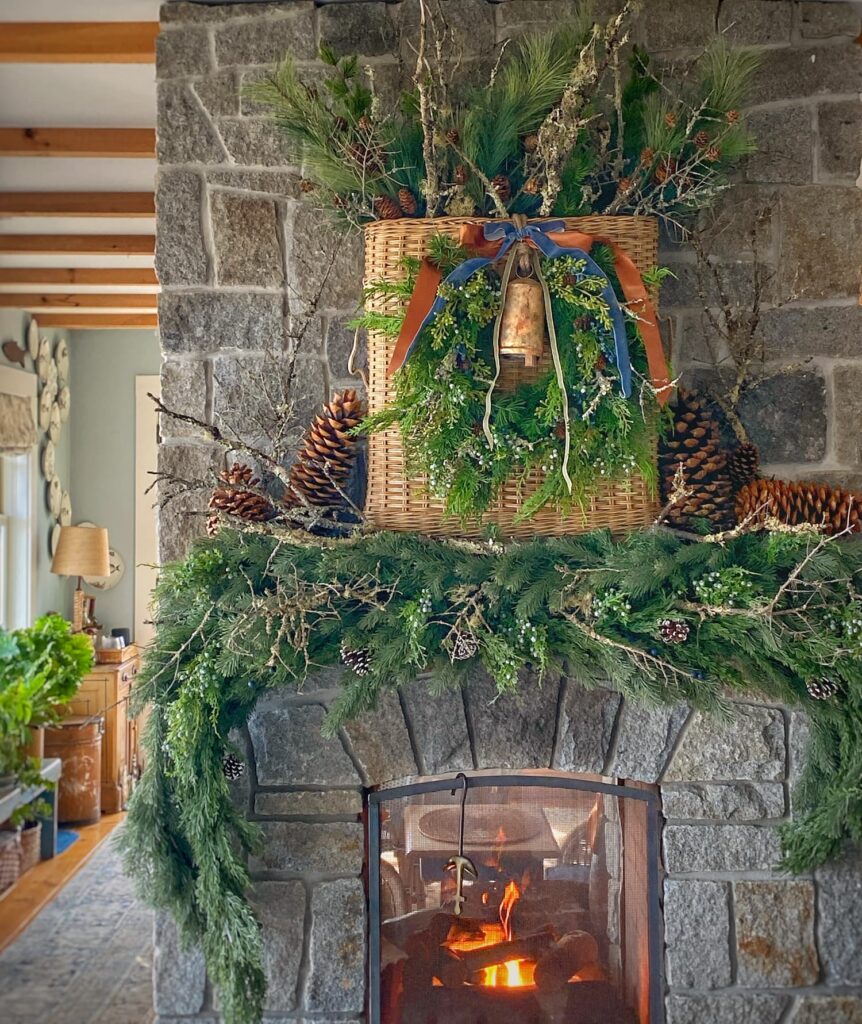
I generally keep my holiday decor pretty simple.
But for the living room mantel, I do go all out.
Inspired by my walks with Maddie and Cisco, I wanted it to have a wild coastal Maine woodland feel — greenery, pinecones, lichen covered branches, and of course pops of ocean blue.
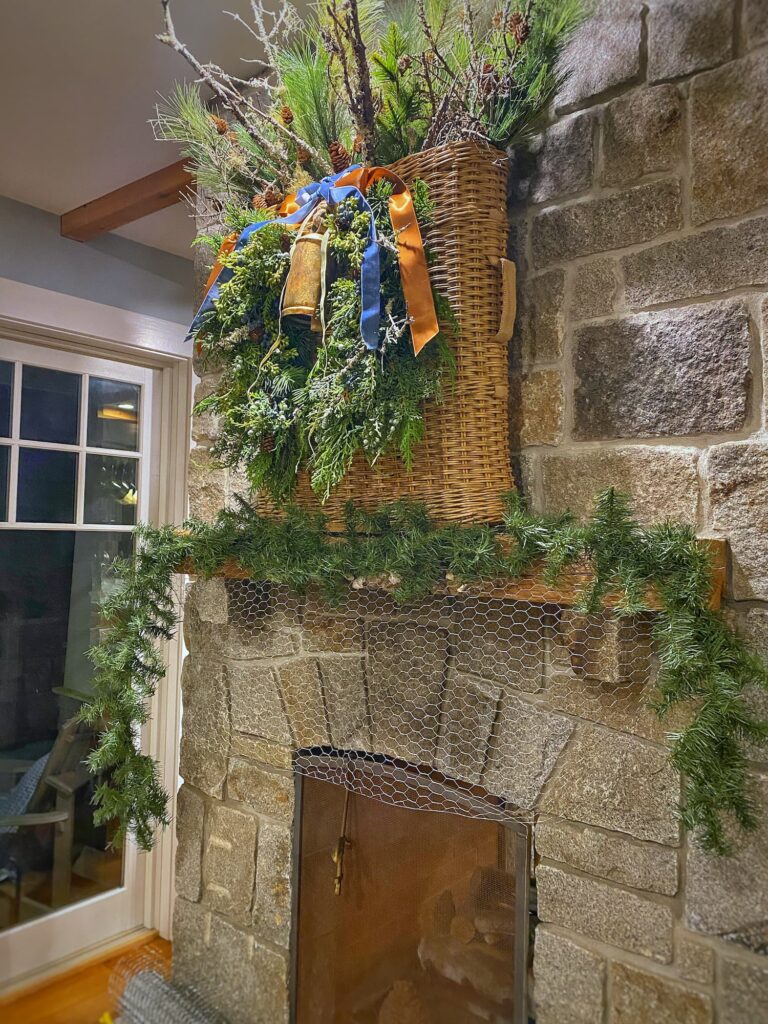
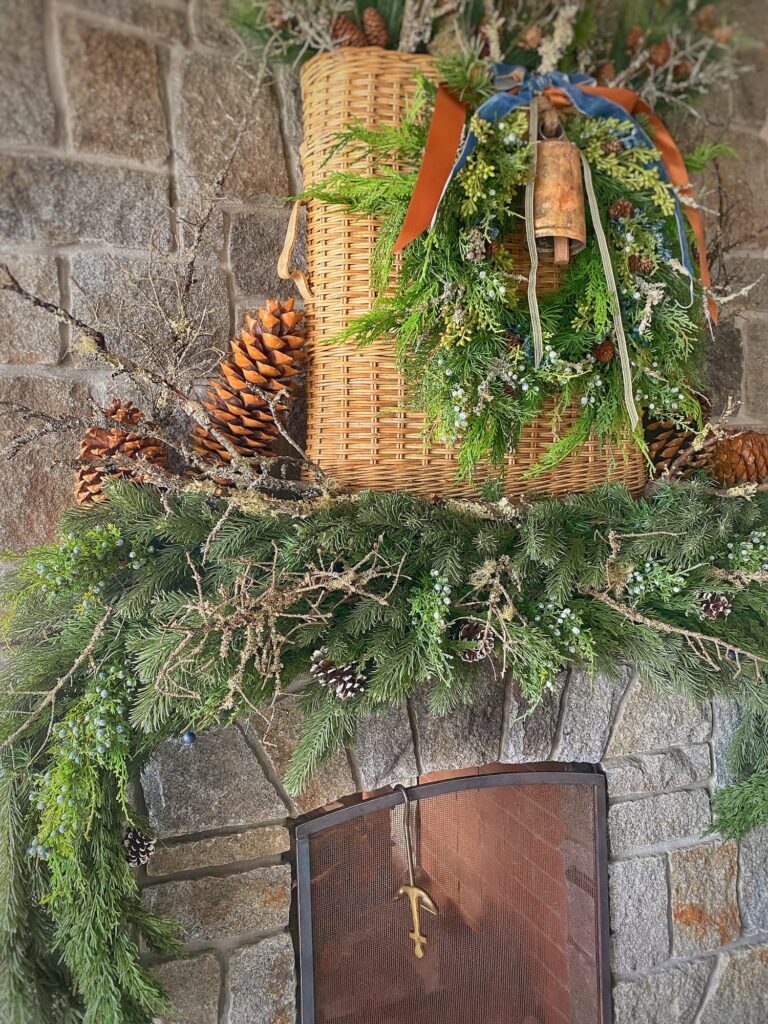
My Embellished Wreath
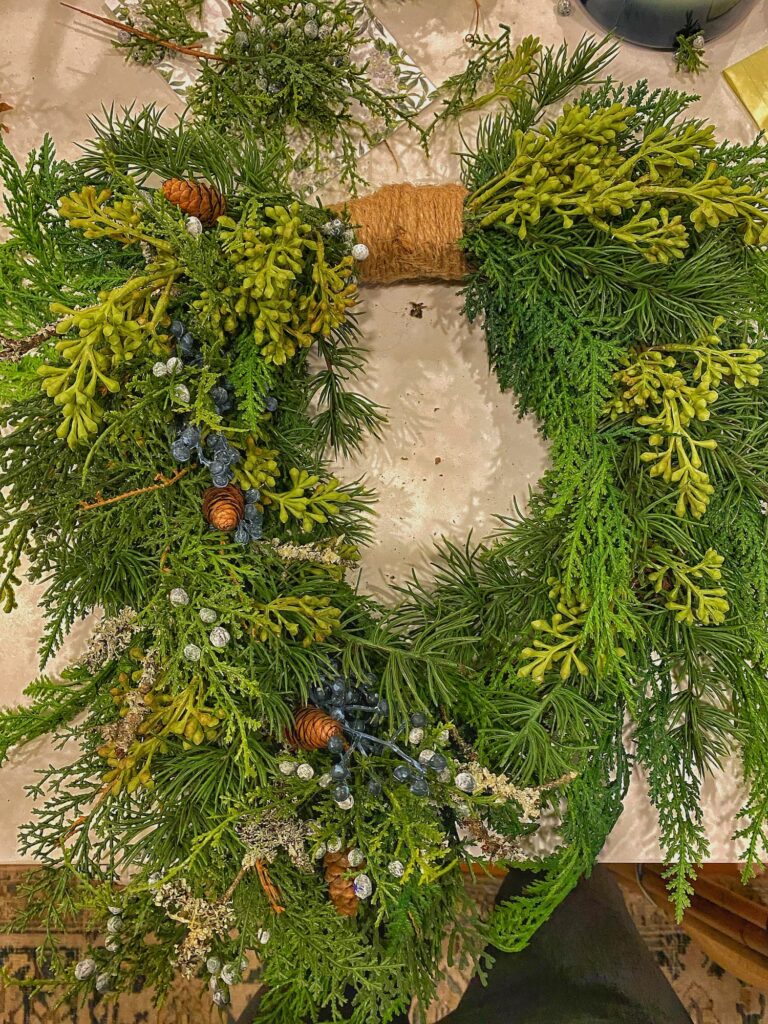
I embellished a faux greenery wreath with the same elements I used on the garland — juniper pieces and foraged sticks.
You may have figured out that I am a bit obsessed with these branches that I find littering the forest floor! They have so much character! I can’t go on a walk this time of year without bringing a few home!
A hammered bell and a three-ribbon bow, are the finishing touches. For now I am using the bow from last year. I have some new ribbon on order. We will see what I come up with!
The Basket
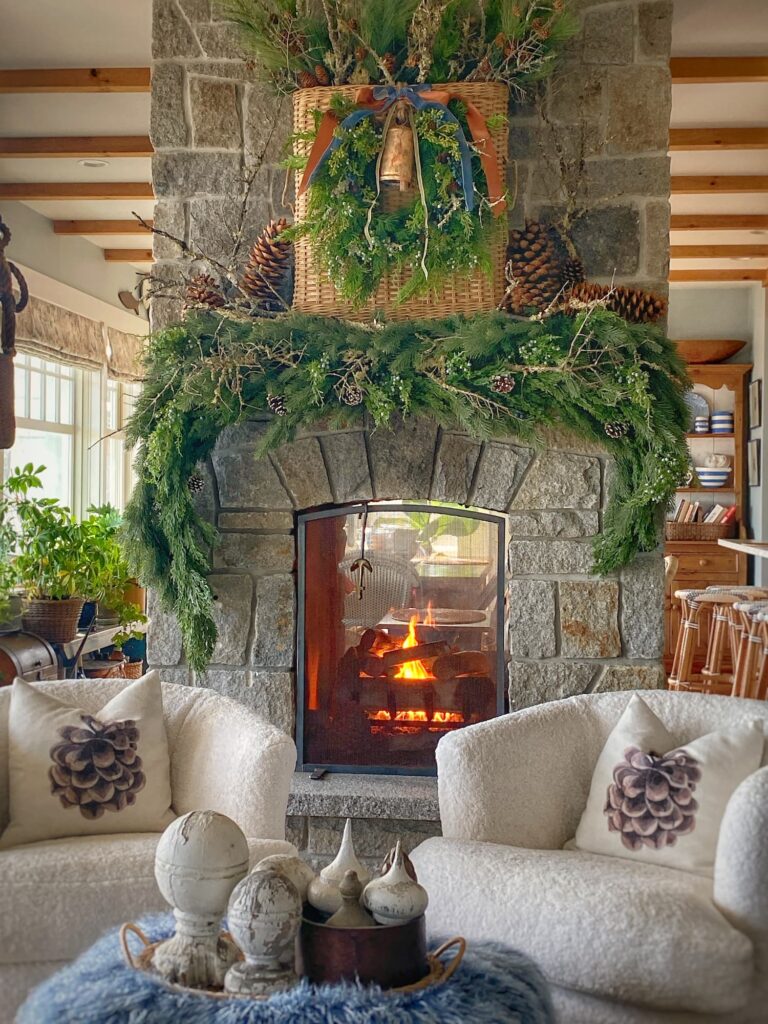
This is the third year I am using this vintage artillery basket on the mantel for my holiday display.
I actually attach it to the mantel with some screws to keep it from tipping over. Thank heavens for that rustic beam mantel!
I changed things up a bit this year a bit with the wreath instead of the large bells I have used previously. And I added some branches to the greenery the basket holds.
Easy!
Natural Elements
Once I was done with basket and garland, I tucked a few more of the natural elements in on the sides of the mantel.
I shared some resources for the giant Sugar Pine cones in my blog post a couple weeks ago.
You will have to come on a walk with me, Maddie, and Cisco to get some of the branches!
This Week Into Next
I have been busy this week with holiday decorating.
And if you follow me on Instagram, you know that I also did some re-decorating earlier this week, when I made a large and unexpected furniture purchase.
On Black Friday we did some shopping in Kennebunk/Kennebunkport, and I fell head-over-heals in love with an 1800’s folk-painted Bavarian cupboard. It is a spectacular piece and I was lucky to get it at 60% off since the store is going out of business.
I will share more about this piece and my love of antique painted furniture in the new year!
Suffice it to say, these days I might be spending more time facing inwards, admiring my new piece, than looking outwards at the ocean view!
This weekend and next week I plan to finish my holiday decorating. I need to go order my natural wreaths and garlands for outside. There is still work to be done in the dining room, which includes swapping out the dishes in the big hutch. I have a few new additions coming from my friends at Caskata this year, which I am excited about!
And I have some more Christmas shopping to do. I have a lot of gift ideas; I just need to make the purchases.
Like many of you, I have a lot going on. At the same time, though, I am trying to stop and savor the beauty of the season. I am looking forward to joining friends at a wreath-decorating get-together on Sunday!
And thankfully, I have a jump start on my blog post for next week!
Be sure to let me know if you give the chicken-wire garland method a try!
Thanks for “hanging” out with me and my garland today!

Questions, comments, or just want to say hello?
I’m always happy to hear from you.


Molly your mantel is stunning. Wow. Your posts are always a delight. Thank you for sharing. Enjoy your weekend.
Hi Suzie! Thanks, as always, for reading my post and for taking the time to say hi! Have a wonderful weekend!
Oh, how beautiful! I love your mantle and the wreath. Everything turned out amazing.
Thank you, Debbie! My late-night shenanigans paid off!
Molly, where on earth did you source the lovely little folk animal pillow on the couch in the photo of your new Bavarian cupboard – which is stunning by the way!?
Hi Pam! The pillow is from Coral and Tusk. Coral and Tusk is offering 20% off one order all month with code MOLLYINMAINE20!
Hi Molly! we have plenty of chicken wire around here as we used it to make tomato cages. One year I even used it as garland on a garden themed tree! Next year I will put it to use in decorating a mantel.
Hi Jane! That is great! I have also seen people place it in a container to support flowers in an arrangement! Who knew there were so many uses for chicken wire?!
WOW! The mantel looks fabulous! I love those branches too. I take photos instead of taking them home. I love how the new armoire fits in with the new throw pillows and the decorations that you have put on the table. That armoire really was meant to be in your house.
Thanks, Liss! I can’t help picking the branches up when I am out for a walk — or even in the driveway! I am so happy with the new cabinet. Mom’s dough bin is happily reunited with the chest of drawers in the navy blue bedroom!
Love how your mantle and basket turned out……lush and natural…..true Maine. Very inspirational!
Thanks, Cindy! I wanted it to be a little wild — like the landscape here!
Wow, Molly … definitely a wow! Absolutely love your holiday home … especially the mantle garland. I’m going to have to stay up late and see if my creativity kicks in. Probably not, but I’ll give it a try. 😉 So beautiful! xo
Hi Juliet — I don’t think you are lacking in creativity. Maybe you are just more sane than me and manifest it during the daytime hours! I had fun with this one, once I got the hang of it!
Love your tip with the chicken wire Molly..as always love reading your blog and seeing all your ideas come into play.
Enjoy and keep on blogging.
Thanks, Joyce! The chicken wire really does form a stable base for everything. Suzanne is a smart cookie! Thanks for joining me here!
I love the garlands, but am wondering if all the greenery is fake/faux or is some of it real pine/spruce/fir?
Did you go to Antiques on Nine in Wells while you were in the Kennebunk area? It’s going out of business
and has had really amazing things in the past. I am so sad to see them go.
Thanks for your inspiring blog, it’s wonderful. Love your sense of style!
Hi Martha — Yes, I have switched to all artificial in the house. The real stuff just doesn’t last inside. I use that outside and it does well! And yes! I got the new cabinet from Antiques on Nine. It is sad they are closing, but it meant I got 60% off my beautiful piece! Thanks for joining me here!
This technique is genius! Loved seeing the step by step instructions, one day I will try and spice up my garlands with this technique. Have fun wreath making!
Hi Zo — Everything you do in your home is beautifully perfectly you!
Love the mantel Molly. Suzanne is such an inspiration for sure and can’t wait to see what you do with the flowers😉
Thanks, Ann! Suzanne is a power house, for sure!
Hi Mollie
I will try this again. It did not publish for some reason. You inspired me to use my artillary basket on our front gate! Thank you for the inspiration!
Hi Cindy! Ooh, have you shared a pic of that? I would love to see!
Whoa Molly, that garland seriously stunning! Good tips too! Your house is just so sigh inducing… 🙂
Aw, thanks so much, Rosie! Once I got the hang of it, the chicken wire worked great!
Thanks for the step by step with using the chicken wire! It really came out beautifully! I hope I will have a mantel if I ever move to NH! I like the mantel greens full and natural as well and the branches are just great with all of the lichen. The wreath is a great change but I love the bells as well. Maybe next year again!
Amy
Thanks, Amy! Once I got in the groove, the chicken wire really worked well. I think next year I will use three strands of the bendy garland to secure everything. The chicken wire would be great for a centerpiece too — roll it into a long cylinder and stick the greenery in it! I hope you find a place in NH so you will be closer to me!
I love your decorating and look forward to reading your blog. One question about the garland, how do you keep the needles from falling off and making a mess?
Thanks so much, Nancy! Easy answer to you question — I use artificial greenery! I gave up on real greenery years ago because of the mess it made. I do use real outside, where it stays fresh!
Very beautiful Molly!! I particularly like the blue and rust ribbons together on the basket. It’s a great combo!! Happy December!!
Thank you, Peg! I do love some warm tones with my blues!