How I Stack Wooden Bowls to Add Cozy Texture and Color for Fall
Natural and painted wooden bowls add cozy texture and color for fall. Here’s the unique way I styled mine — and gave one an antique-style painted finish.
A Simple Way to Add Warmth for the Season
Surprise and hello on a Thursday from the Maine coast!
I’m popping on here outside my usual schedule to join a lovely group of fellow bloggers who are sharing how we make our homes cozy this time of year. How fun!
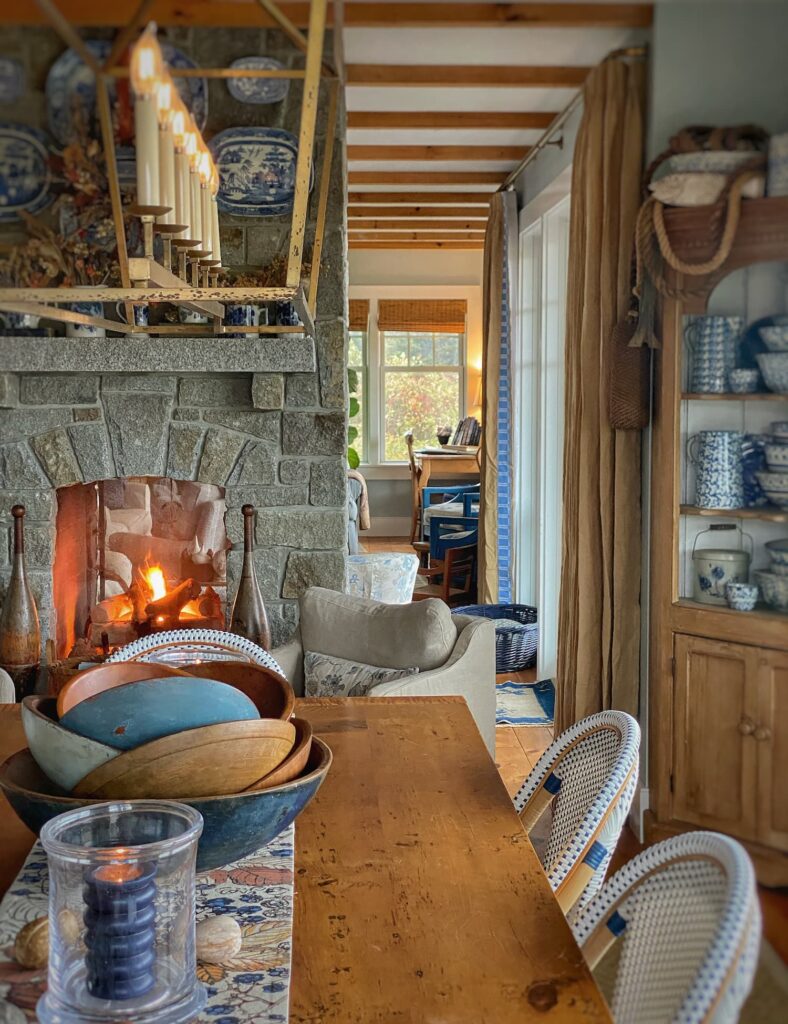
Lately, I’ve written quite a bit about the cozy layers I’ve been adding around the house as the leaves (and temperatures!) drop. Today, I’m piling on even more warm texture — quite literally — with my signature stack of wooden bowls.
I’m sharing the unique way I style a mix of natural and painted wooden bowls, along with how I gave a plain vintage bowl an easy antique-style painted finish. This simple stack of wooden bowls brings together everything I love about fall decorating — warmth, texture, color, and just the right amount of story.
After you read my post, be sure to hop over and see how my friends are making their homes cozy this season — you’ll find all the links at the end.
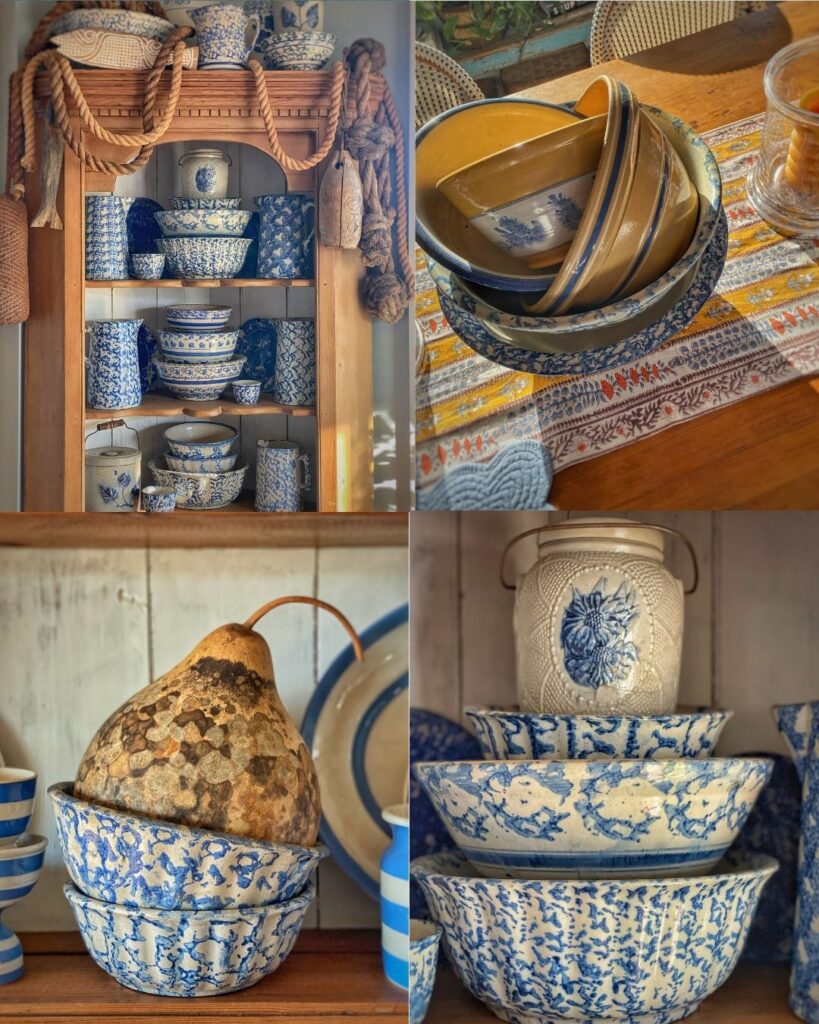
Inspiration — Bowls with a Story
Last Saturday I wrote about what I’m always on the lookout for when I go antiquing. (If you missed that post, you can read it here.)
One of the items on that list is old wooden bowls. I love that they’re both utilitarian and decorative. Some are hand-carved, their wonky, less-than-perfect shapes giving each one unique character. Others are hand-turned, their subtle grooves and variations telling their own stories. Both have time-burnished finishes, which bring a quiet warmth and soft texture to any space, adding a layer of depth that feels especially welcoming as the days grow shorter.
And then there are those that are painted. These bowls are particularly charming, with their worn and chipped paint adding color and personality to each one.
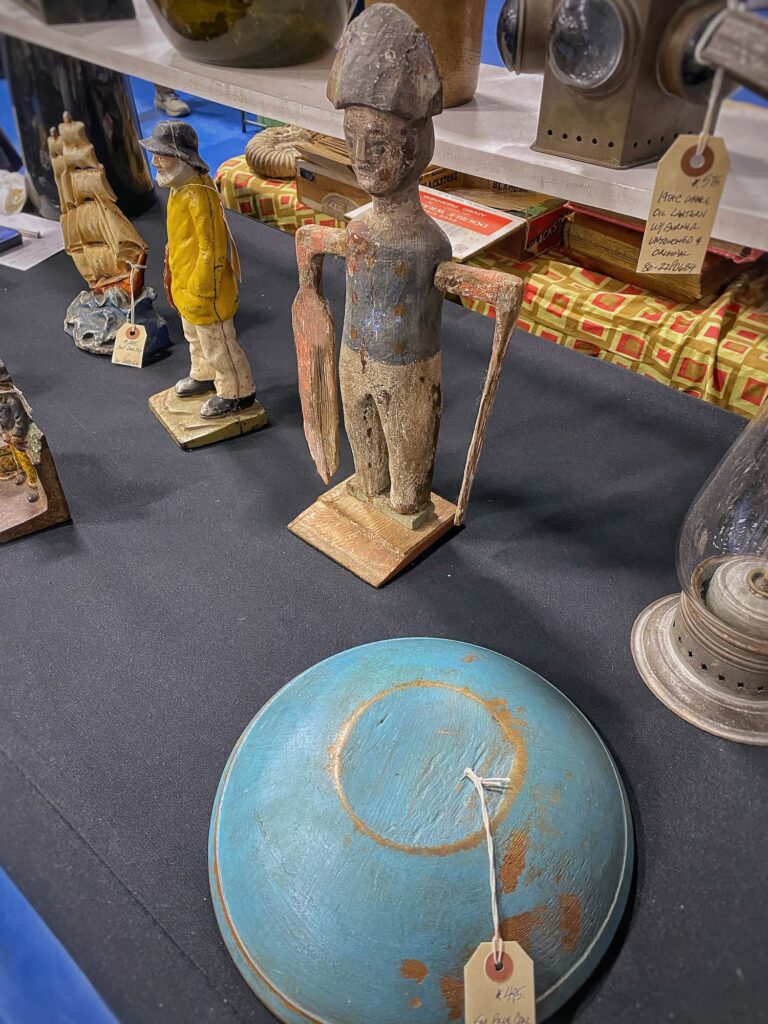
The painted bowls, in particular, can go for a pretty penny, though. I was lucky to score a large one with deep blue paint at an auction several years ago. I got a very good deal on it, but it was still an investment.
And recently at the Bath antiques show, I spied a lovely bowl with beautiful bright blue paint. It was more than I wanted to spend, but it got me thinking about a little DIY project. So the other day, I selected one of the bowls from my collection and got to work. Let me show you how I transformed it from ordinary into something special!
Giving a Wooden Bowl an Antique-Style Painted Finish
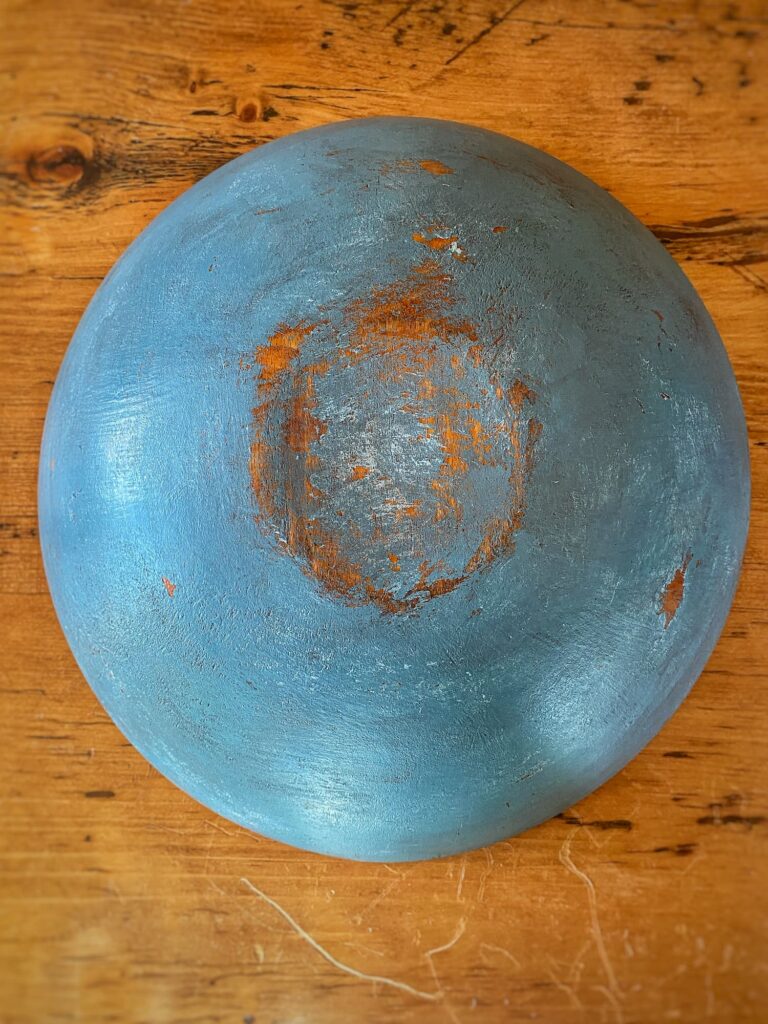
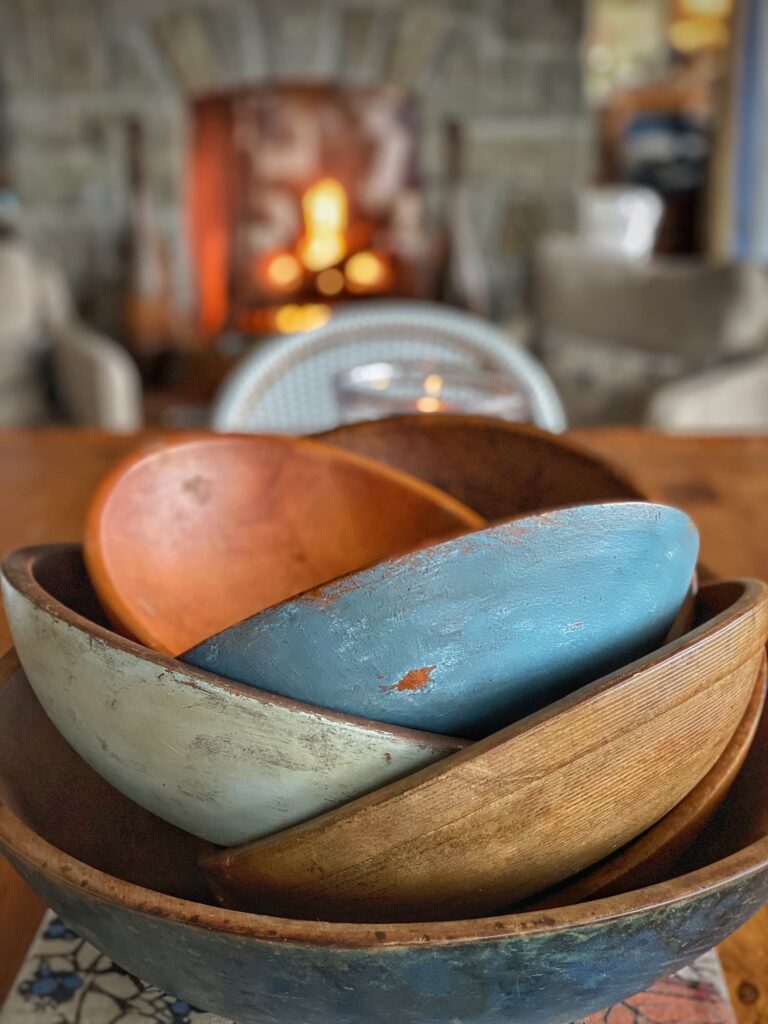
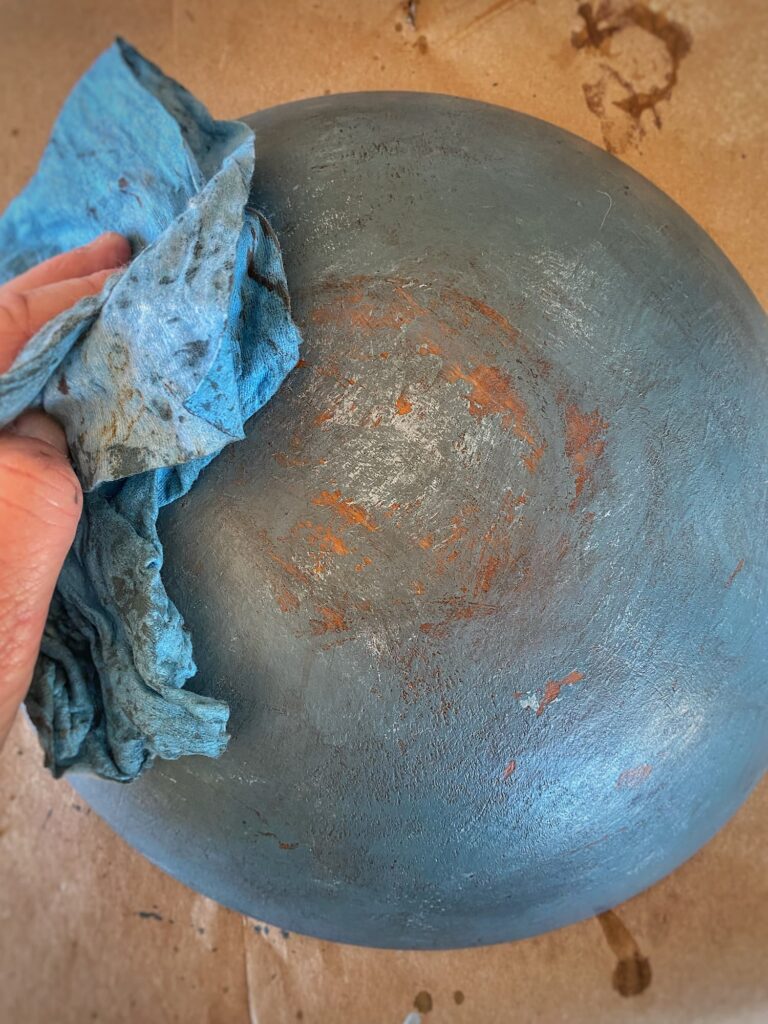
I had painted the outside of one of my wooden bowls before — a pale, distressed blue — so I knew this would be an easy project without hard-and-fast rules. The process is really just a matter of blending layers of paint and then wiping or rubbing them away until you get the amount of patina you like. For me, it was a fun and relaxing activity… music required!
Materials
- Wooden bowl — I chose a small vintage rusty brown bowl from my collection. It was nice, but not a fine antique.
- Paint – I used two shades of blue I had on hand from the house, plus a burnt umber craft paint.
- Paint brushes – I prefer inexpensive brushes with coarse natural bristles. They create a slightly rustic texture in the brushstrokes.
- Rag or paper towels – For wiping and blending the paint.
- Steel wool – For light distressing.
- Disposable container or lid – For watering down the brown paint to make a wash.
- Optional paste wax – For buffing the finish once the paint is fully dry.
How To
- Start with the pale blue undercoat
Using an almost dry brush, apply the pale blue paint in random swathes across the bowl. Don’t cover the entire surface—just scatter the paint in different sizes and shapes. This creates variation and dimension. - Add the darker blue layer:
Apply the darker blue paint the same way, leaving some of the pale blue and the natural wood visible. Be sure to keep a few spots along the rim and bottom bare—these are areas that would naturally show wear. Go light with the paint; it’s easier to build up than to take away. - Blend while the paint is wet
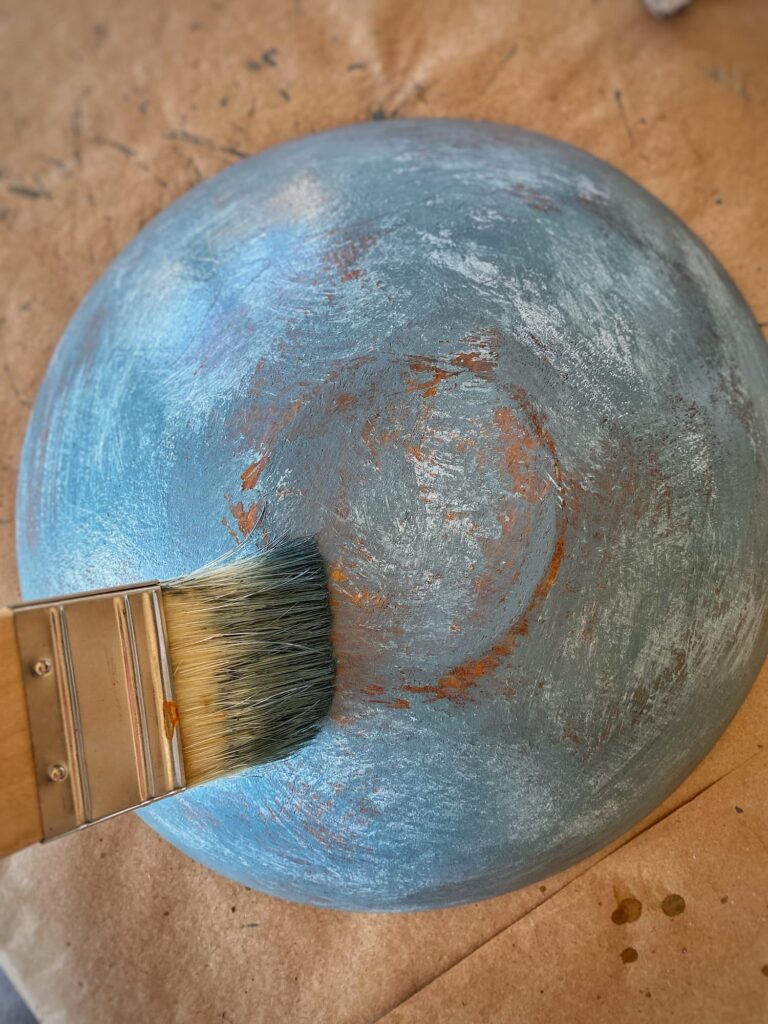
With a dry brush, begin blending the paint using a mix of brushing and dabbing motions to create texture. Don’t aim for perfection—the irregularities are what give it character. - Wipe and rub for further blending
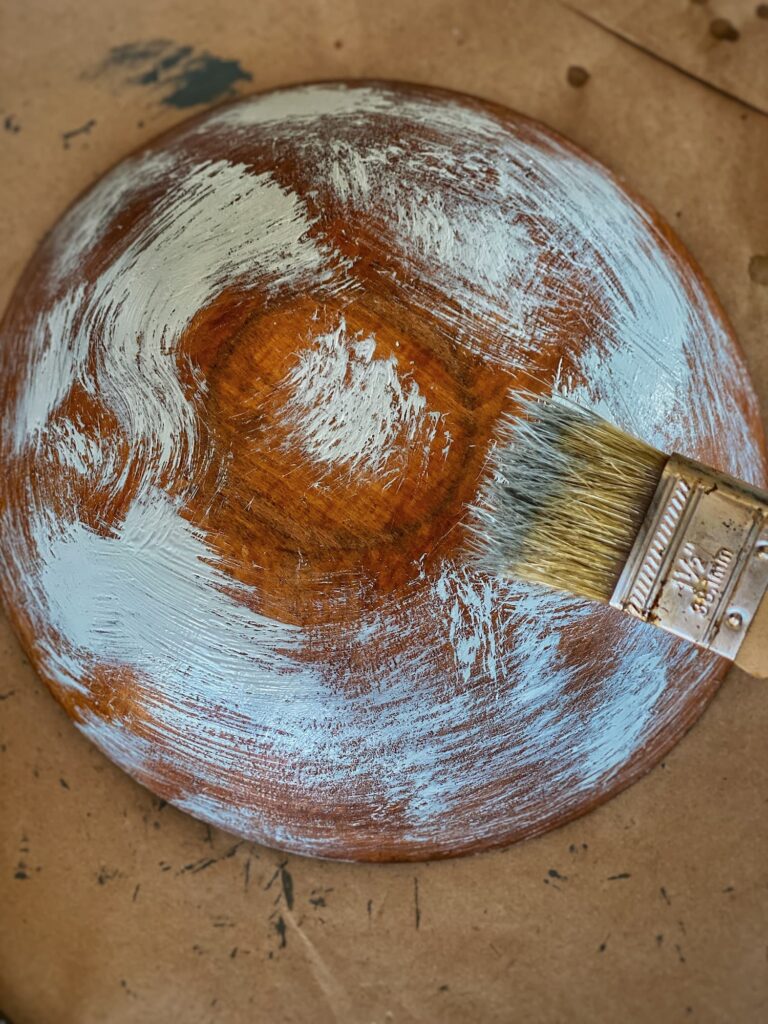
Use a rag or paper towel to continue blending. Rub firmly in some areas (especially along the rim and bottom) to remove paint and create worn, layered effects. It’s nice to leave a few rubbed-back areas along the sides too for interest. Keep working until the paint is almost dry. - Apply the brown paint wash
Thin the brown paint with water (I used a small container, adding water first and a few squirts of paint in the center, then mixed it on the brush). Lightly brush the wash onto sections of the bowl, then immediately wipe to blend and remove excess. The wash should be subtle—just enough to add an aged patina. - Adjust and refine
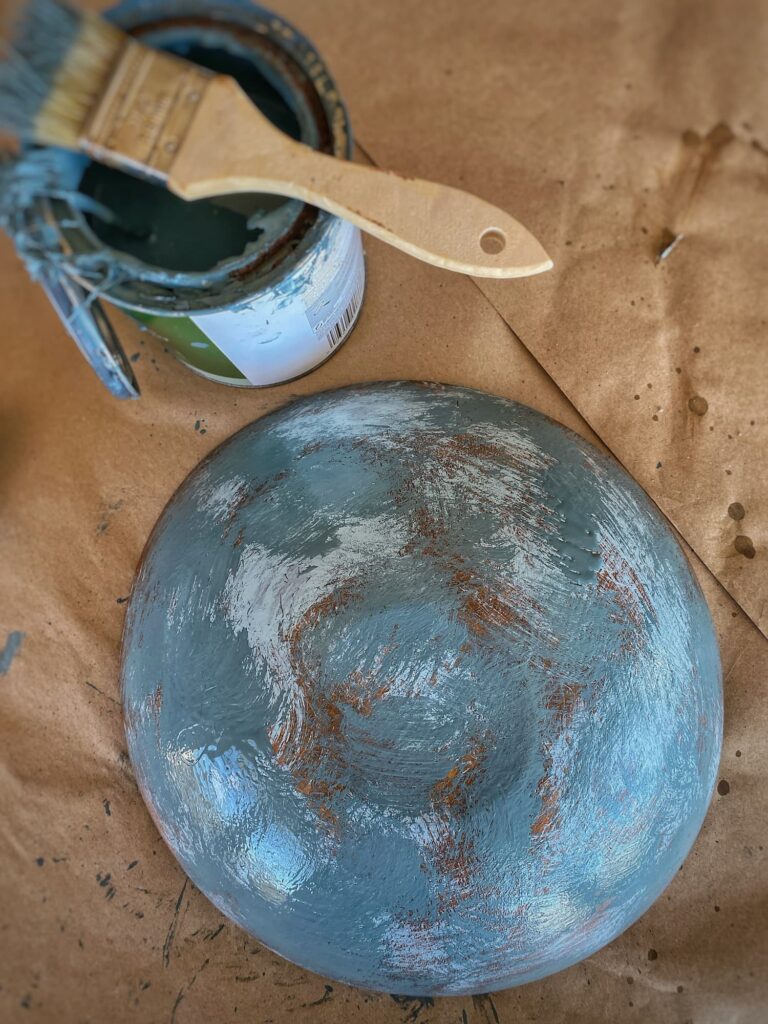
Step back and assess your bowl. If needed, add more paint or wash in areas where you’d like more depth or variation. - Distress with steel wool
Once the paint is fully dry (or nearly dry from all the wiping), gently use steel wool to remove a bit more paint from select areas—especially spots that were left bare to begin with. This enhances the naturally worn look. - Finish with wax (optional)
For a soft sheen and a smooth finish, apply a light coat of paste wax and buff gently.
Now let’s style your newly painted bowl!
Styling a Bowl Stack with Color and Character
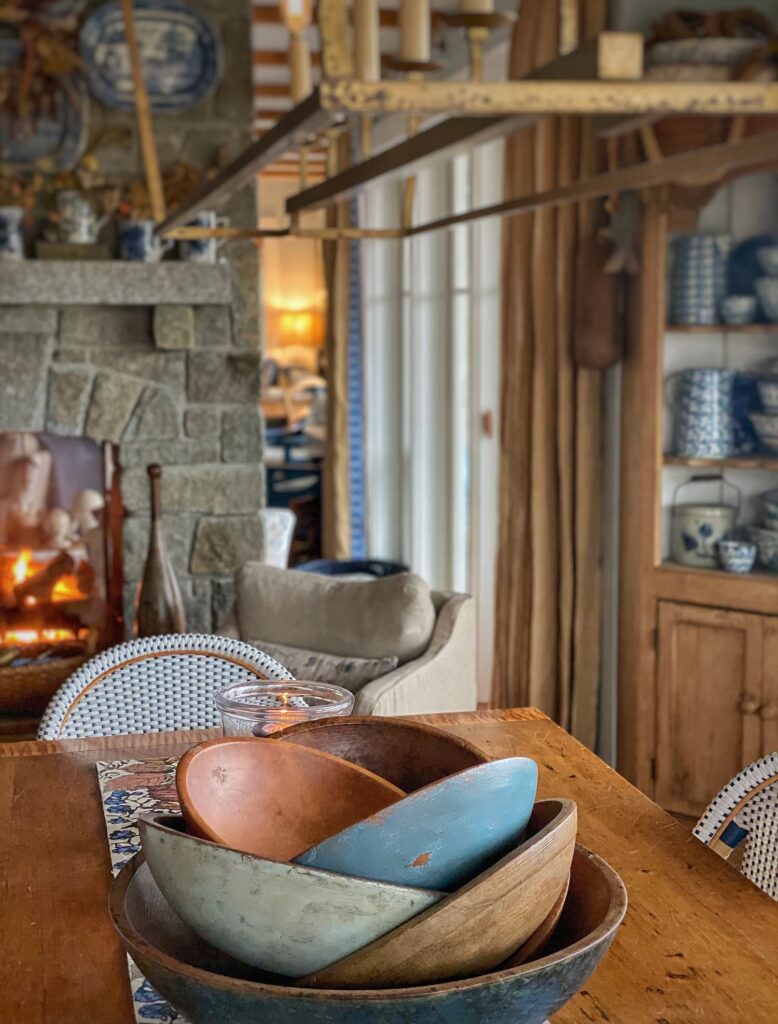
My favorite way to display a collection of bowls is in a stack. But I’m not talking about your average everyday stack!
Don’t get me wrong — I don’t have anything against a straight stack of bowls. They can be quite impressive! But they don’t have much movement or energy. And most of each bowl is hidden inside the one beneath it. You can’t see the unique wood tone, texture, or — in this case — color.
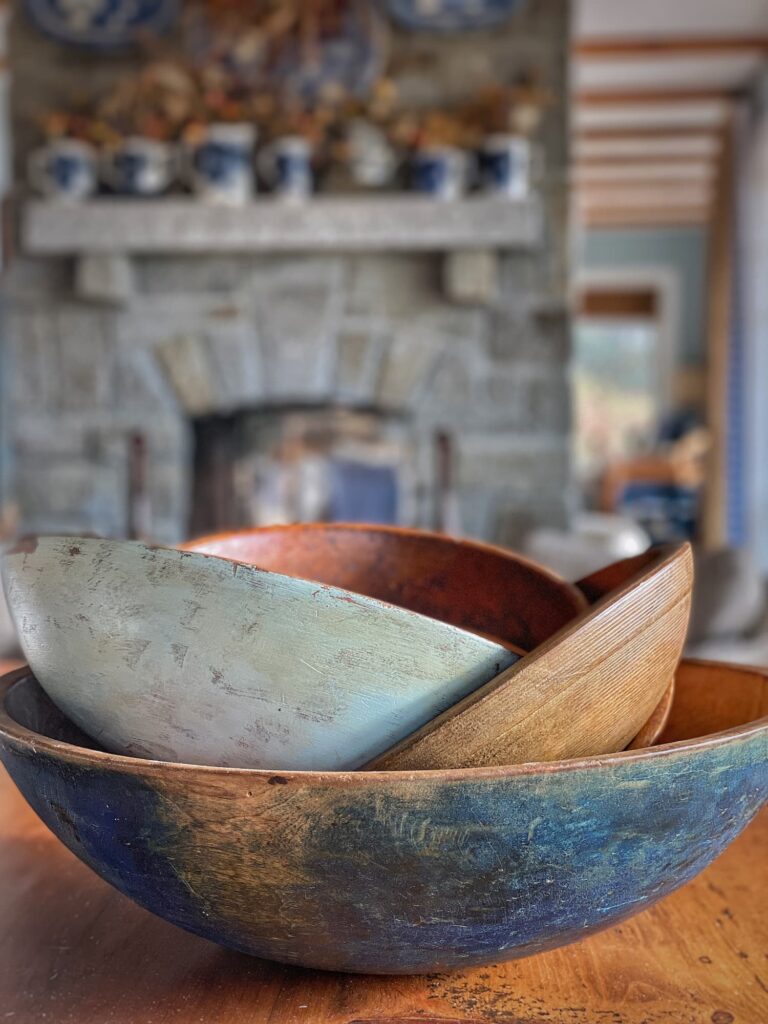
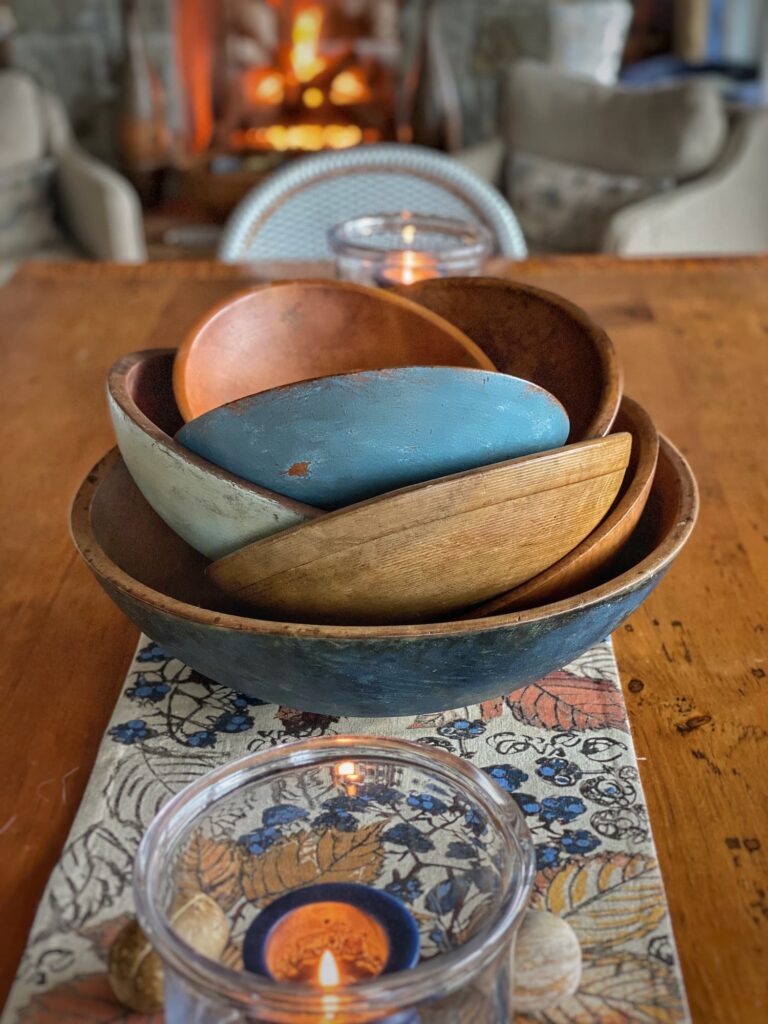
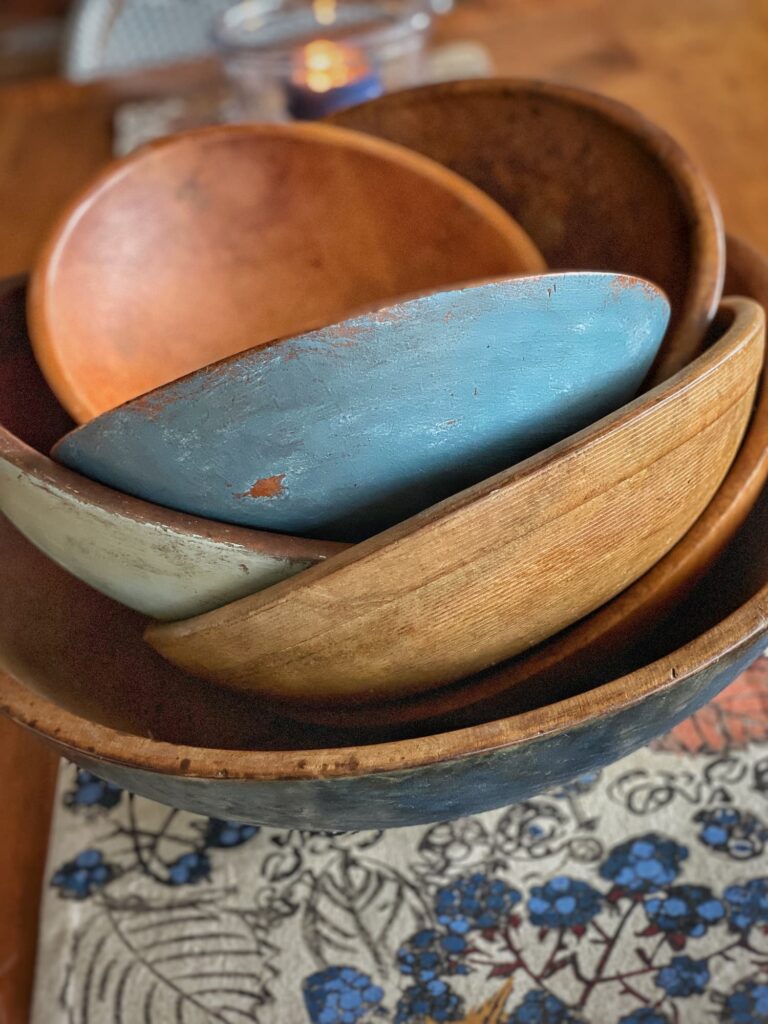
So instead, I tilt the bowls and angle them in different directions as I build the stack. This way, more of each bowl is visible, and the whole display has a dynamic, casually jumbled look. It highlights the mix of tones, patina, and paint, giving the stack a collected-over-time feel. I like to combine lighter and darker woods with a few painted bowls for contrast. It’s a simple technique that creates so much more visual interest.
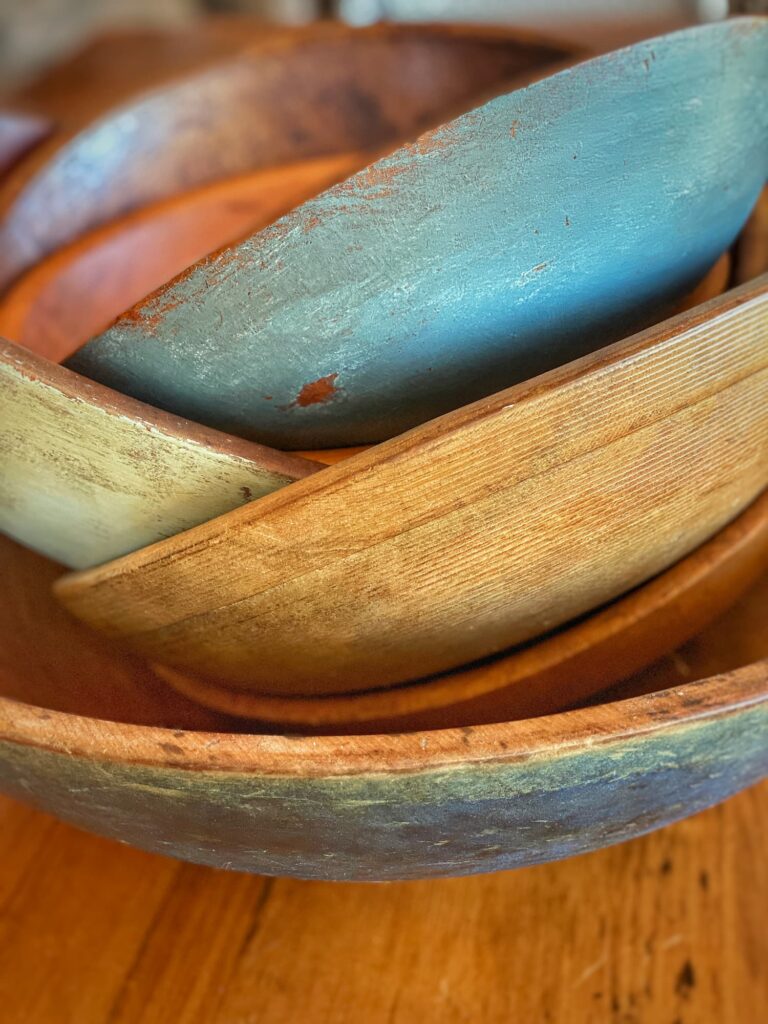
This particular stack on my dining table works perfectly with my cozy fall palette. The ocean blues of the painted bowls play beautifully against the warm wood tones, while the golden yellows and rusty oranges in the table runner echo the colors of the season. The mix feels warm, layered, and inviting — just the kind of cozy feel I love this time of year.
More Bowl Stacks Around the House
This bowl stack method doesn’t just work for wooden bowls.
You’ve probably seen the jumbled stack of spongeware and yellowware I’ve had on the dining table since late September. I keep sharing it because it ticks all the boxes for me — a mix of antique and vintage, old and reproduction. The cheery warm yellow softens and warms my signature cool blues for fall. And the organic sponge pattern paired with stripes and seaweed design is, in my opinion, potter’s kiss.
You can read the story of the reproduction seaweed mocha yellow ware bowl here.
Sometimes I do go for a straight stack of bowls, too. It would look overly staged if each of the spongeware stacks in my corner hutch were angled. My tip when doing a regular stack is to raise the inside bowl up a bit so you can see more than just the rim. I use small, inexpensive plastic food storage containers — easy, invisible, and effective.
However you stack them, bowls add warmth, character, and a collected feel to any space. Do you have stacks of bowls around your home?
Stay Cozy!
I’ve so enjoyed joining you here on a Thursday! I hope I’ve inspired you to start stacking your bowls, pick up a paintbrush, or add a little cozy color and texture to your home in your own way.
Now head over and visit my friends for even more inspiration — these ladies are so talented.
Mary Ann: Classic Casual Home
Cindy: Cindy Hattersley Design
Annie: Most Lovely Things
Melaine: My Sweet Savannah
Stay cozy, friends!

Questions, comments, or just want to say hello?
I’m always happy to hear from you.
Good morning Molly!
I love your new blue bowl! I think I will pull out one of mine and paint it!
Hi Elizabeth — I say go for it! And send me a pic onece you are done!
Molly, you are the genius of creating cozy and I LOVE your wooden bowls. I collect small ceramic bowls from where ever I go (and soup tureens)…but now I want to be on the lookout for wooden bowls.
Mary Ann — Your ceramic bowls would make a fun stack too! What a great collection filled with memories. Thanks for inviting me to join you talented ladies today!
Hi Mollie
You bring back memories of many pantry boxes, bowls, etc. that I have painted in the past. I love simple projects like that! The scraping layers of paint off cupboards (many purchased in Maine) I do not miss!! Thanks for joining us. I always love seeing your wonderful home in any season!!
Hi Cindy — Yes, I love an easy paint project! And the mix of wood and worn paint makes my heart go pitter-pat. So fun joining you ladies today!
I love the simplicity of this, Molly. The photos are beautiful, too. I have quite a few wooden bowls I’d love to paint. Great ideas!
Hi Ann — Thanks! I say go for it! It was a fun and easy little project!
Molly! What a beautiful and original display! It’s earthy, sculptural and the colors are gorgeous!
Xo
Annie
Thank you, Annie! I do love the warmth of natural wood and the patina of worn paint — even when it is newly done!
Molly,
When I saw the blue bowl on your last post my first thought was you should make one of your own. And it turned out beautifully! Well done.
I’ve admired the way you’ve stacked your bowls in the Mad Hatter tea cup style, and feel I should give it a try.
Thanks, Karen! Great minds think alike! It was a fun little project and makes me wonder how many of those bowls with “original” paint going for steep prices are genuine. I guess more discerning eyes than mine can tell the difference, ha. And I love your “Mad Hatter’s” description of my bowl stacks! I say go for it!