How To Sew A Personalized Child’s Fabric Birthday Crown
Step-by-step directions for how I sewed personalized fabric birthday crowns for my grandchildren’s first birthdays.
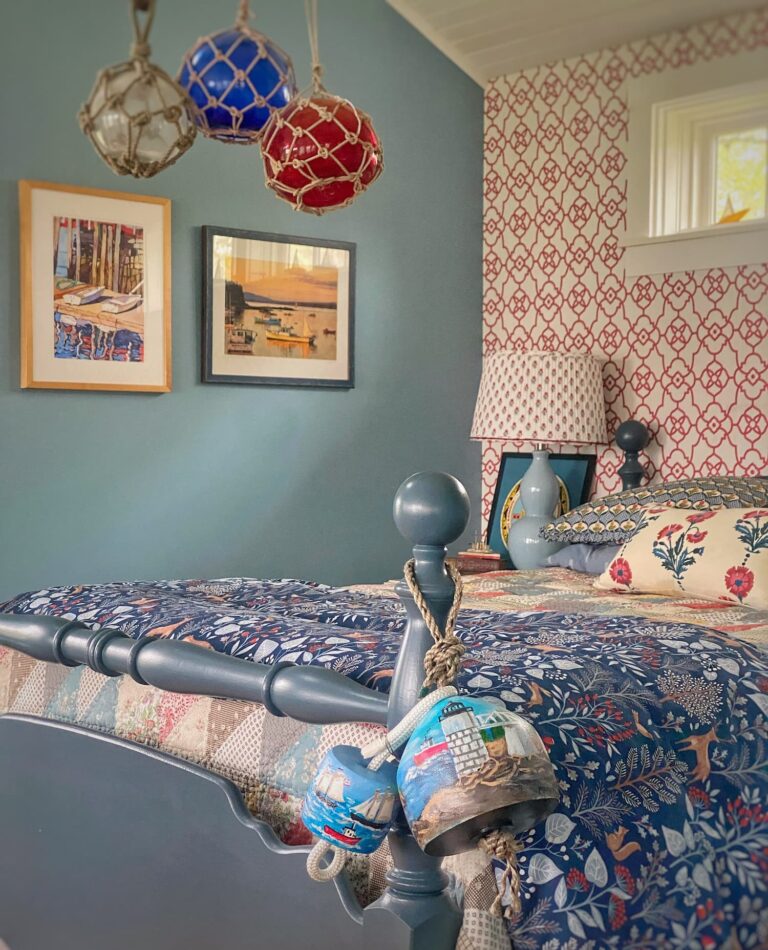
James and Poppy Turned 1!
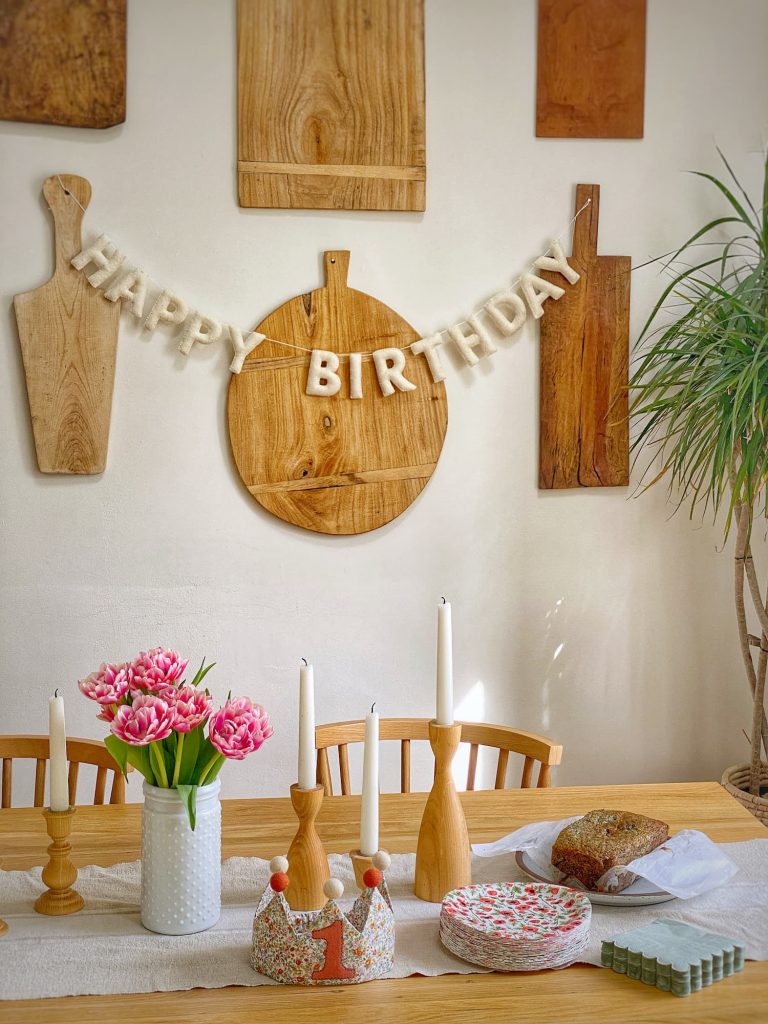
It is hard to believe that my grandbabies have both turned 1 — Jamie in late January and Poppy just last week.
I guess soon they won’t be my grandbabies, but my grand-toddlers!
Jamie is getting ready to walk any day now. He toddles around the house behind his little wooden shopping cart, carefully watched by his furry sibling Megan.
Poppy isn’t quite there yet, but she is very much into waving. On their recent trip to Italy, she waved her way through the airport security checkpoint and entertained an entire restaurant one evening.
What joy they have brought to our family over the past year! (As well as to TSA officers and restaurant diners…)
It has also been amazing to watch my own “babies” step so naturally into the role of parent.
I, at the same time, have been finding my way as “Mim”.
Of course I have been thinking a lot about my mom as we have entered this new chapter of our family life.
Wishing most of all that she was here to meet her great grandchildren.
And also remembering how amazing she was with my kids, so I can learn from how she grandmothered.
Trying, somehow, to fill her very large shoes.
You can read all about my mom’s legacy in my blog post I Am My Mother’s Daughter.
Birthday Crowns: A New Tradition
For several years when my kids were young, my mom made them special birthday t-shirts.
She painted them with their name and age. For the girls, they were bedazzled with jewels and glitter.
I wanted to do something similar to celebrate these special occasions.
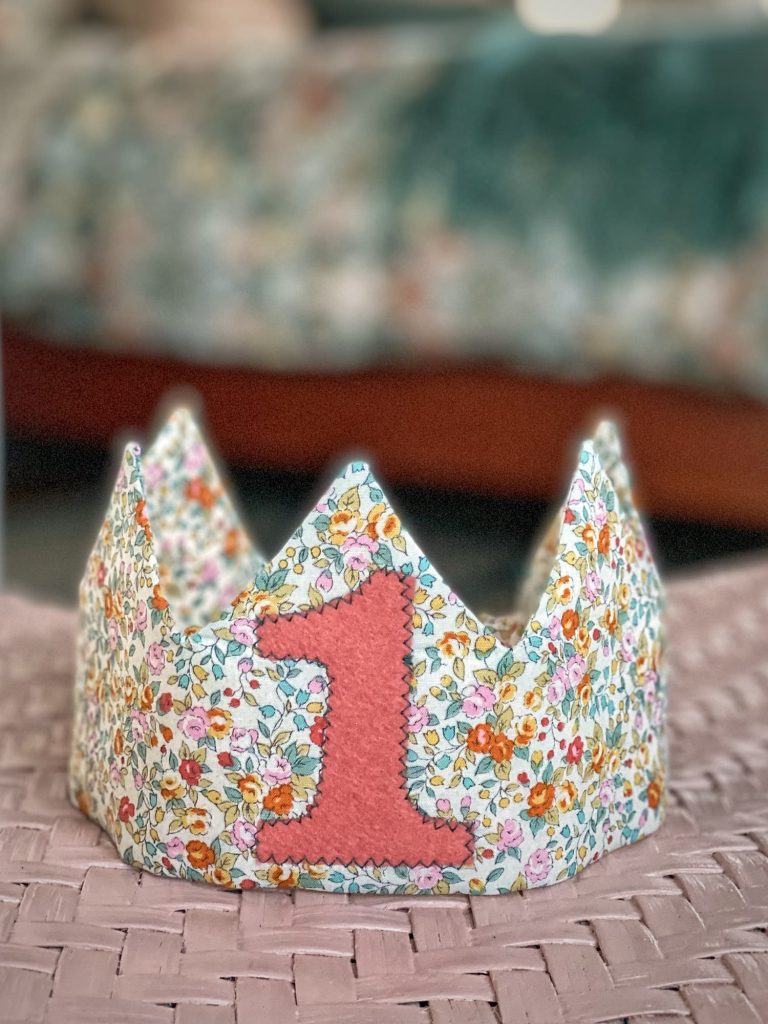
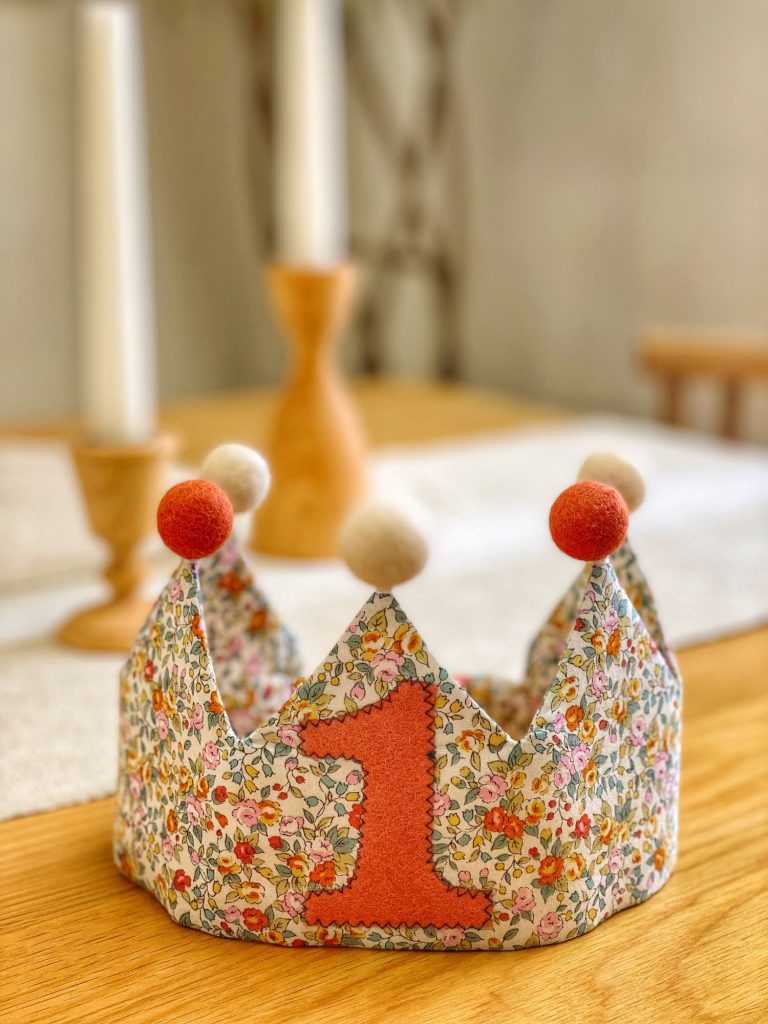
So, in January for Jamie, and just this week for Poppy, I sewed them personalized fabric birthday crowns.
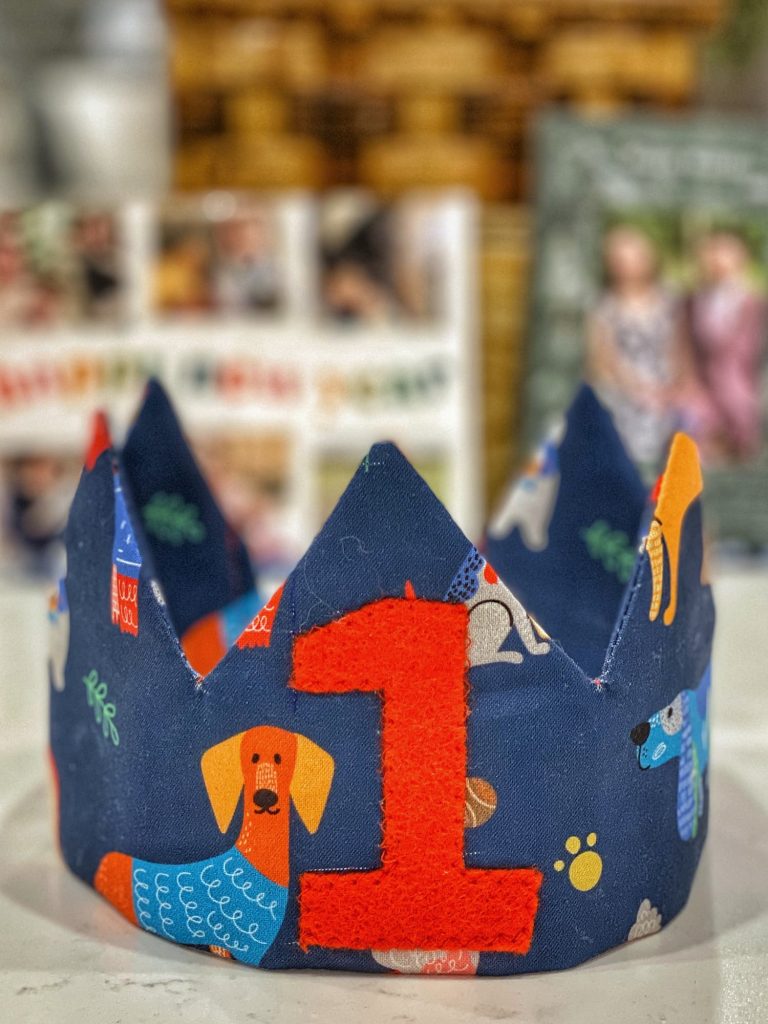
Jamie loves dogs — he and Megan are the best of friends — so I chose a colorful fabric covered in our canine friends.
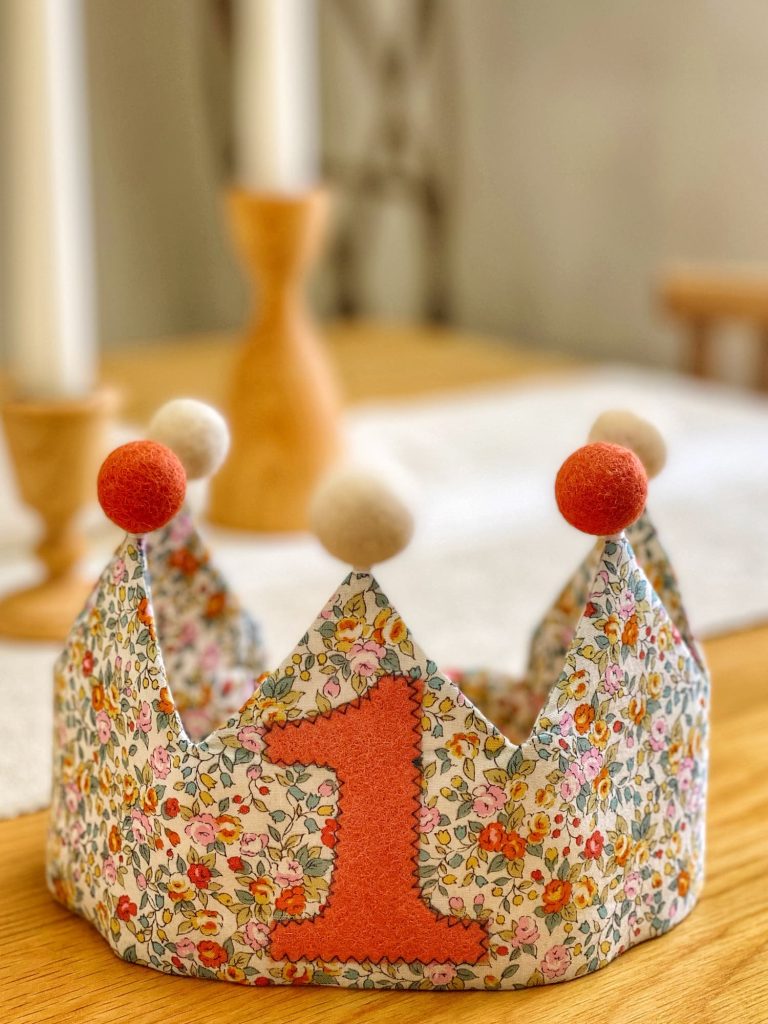
And for my sweet flower Poppy, a pretty floral print.
On the center front of both, I appliquéed a felt “1” and embroidered their name and the year on the back.
As I have mentioned before, I am not an expert with the sewing machine.
These crowns are pretty straightforward, but do require attention to detail.
Here are step-by-step directions for how I sewed these birthday crowns.
If I can do it, you can too!
Birthday Crown Materials

These are the materials you will need to sew a fabric birthday crown with a covered elastic band in the back, appliquéed felt number and embroidered name/date tag, and decorative wool felt pompoms.
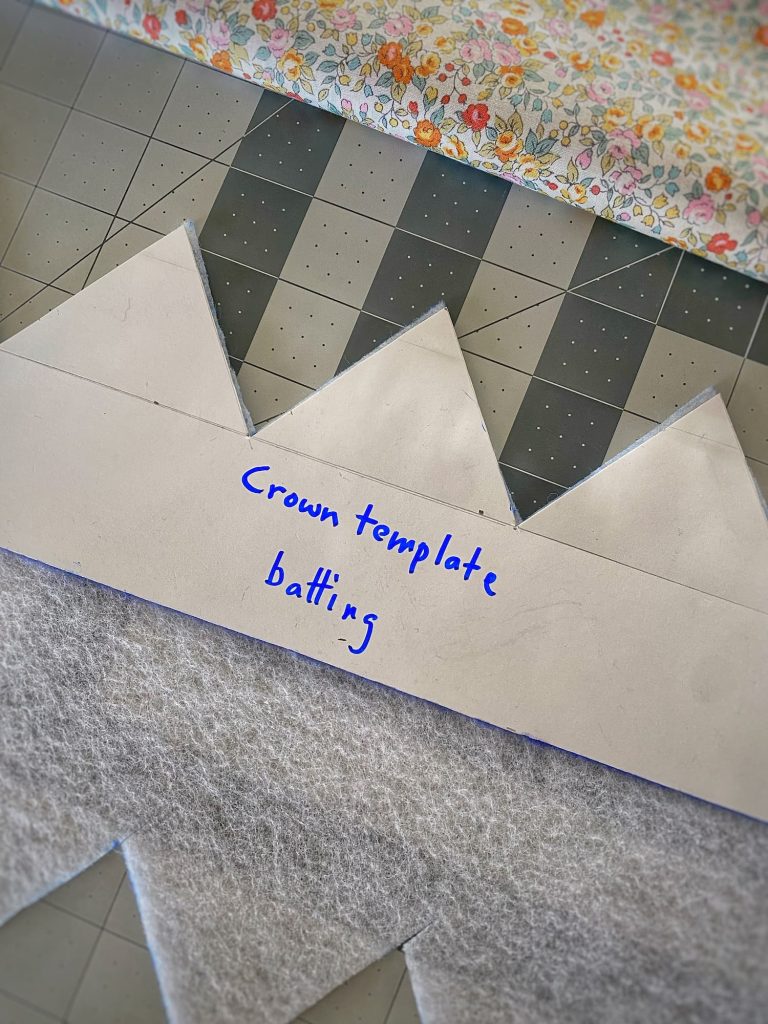
1. Create poster-board templates
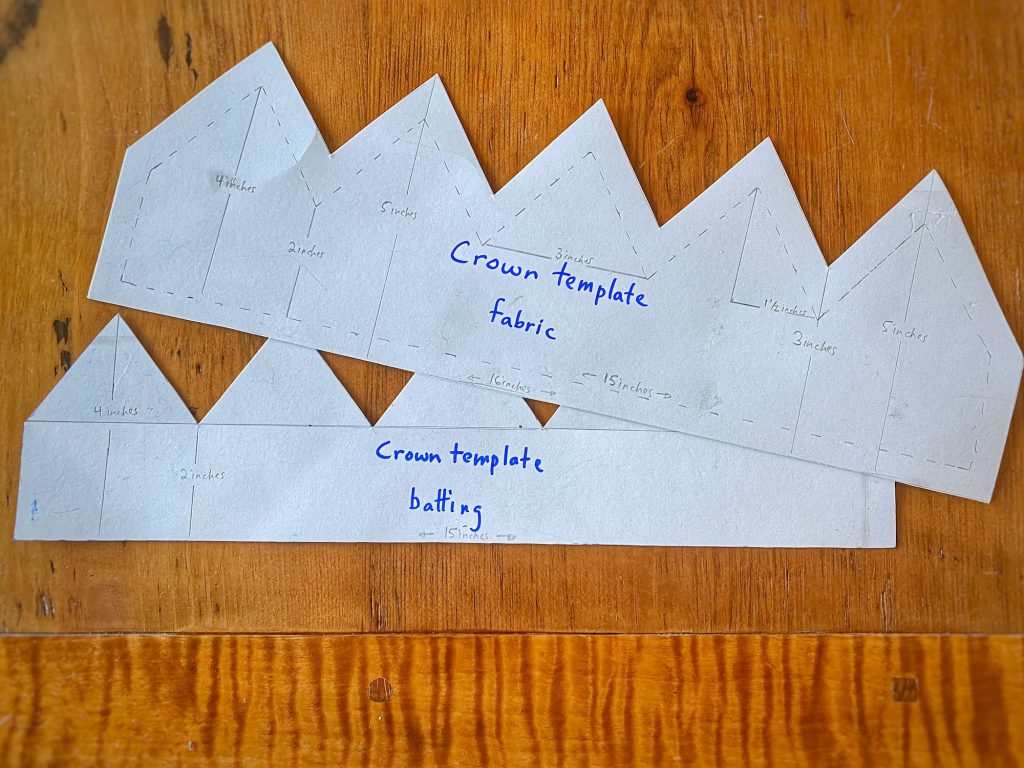
First you need to create two poster-board templates — one for the fabric and one for the batting.
I wanted my finished crown to measure approximately 18″, including the elastic at the back.
I think it is best to have an odd number of points, so that you end up with a center one in the front.
So, I chose to make the body of the crown 15″ wide, with 5 points, each set 3″ apart.
NOTE: Remember that you will be adding an elastic band at the back for a custom fit. So the template should be several inches smaller than the finished size of the crown,
The crown is a total of 4″ tall, 2″ for the base and 2″ for the points.
NOTE: Keep in mind mine is for a 1-yr old. You would want to adjust accordingly for a larger child. Or an adult!
Sketch out your template for the exact size of the finished crown. Then cut it out. This will be for the batting.
Next, trace around your batting template on the poster board to create a second template. This will be for the fabric.
Mark the 1/2″ seam allowance all around, creating a template that is 1/2″ larger on all sides. Cut out.
Lastly, choose a style for your felt number and create a template for that.
Now you are ready to cut and sew the fabric!
2. Cut and Sew the Fabric
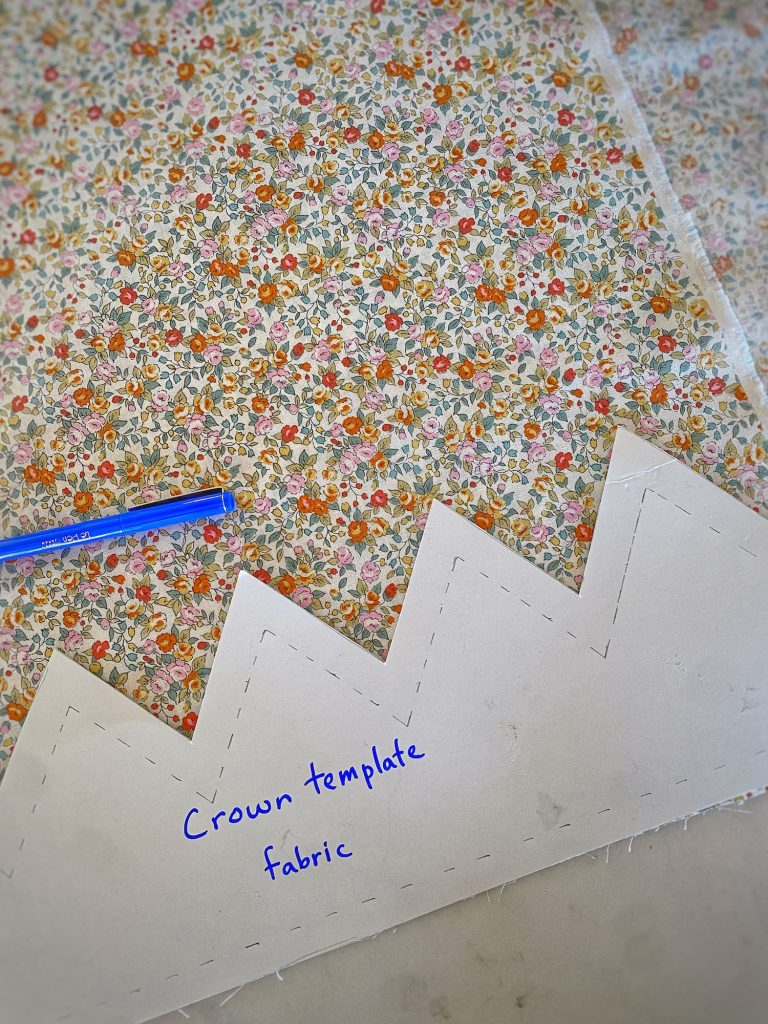
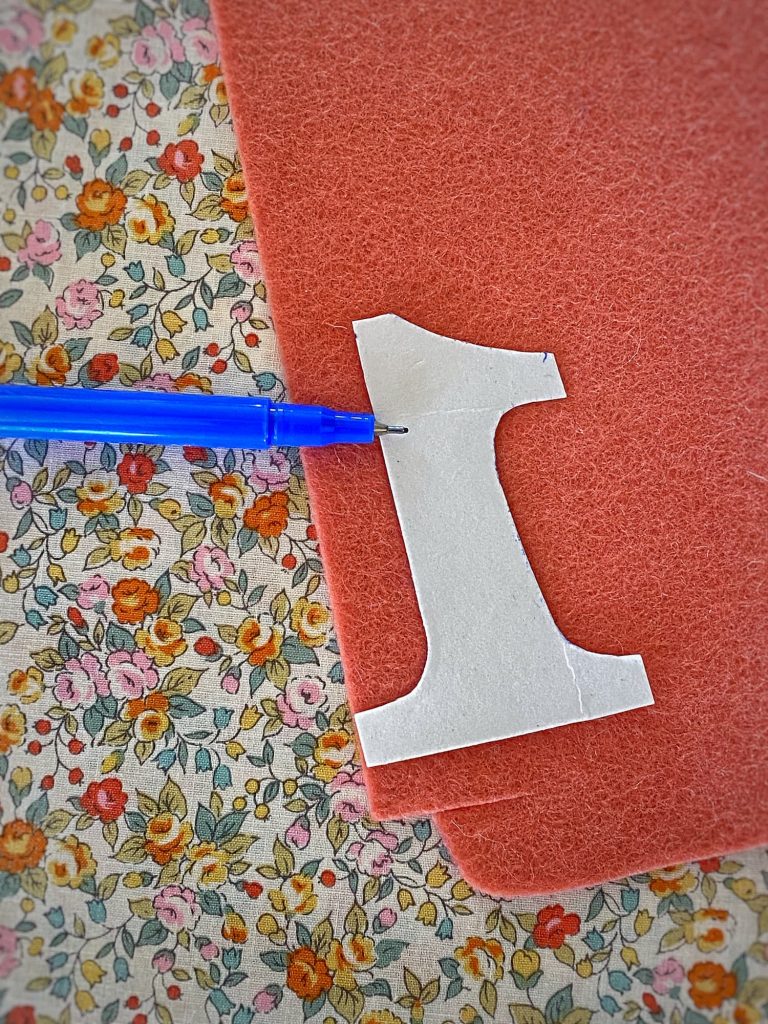
1. Using the templates, trace the designs for the crown and number onto the fabric, batting, and felt. I use a plain old felt tip marker, because any ink will be hidden in the seams. Then cut out.
REMEMBER: You need two pieces of both the crown fabric and batting! I folded the fabric in half and used a roller cutter for nice straight lines.
2. Pin the felt number to the front center of the crown fabric, and then attach with a zig-zag stitch. Before sewing, make sure the applique is within the 1/2 seam allowances on all sides!
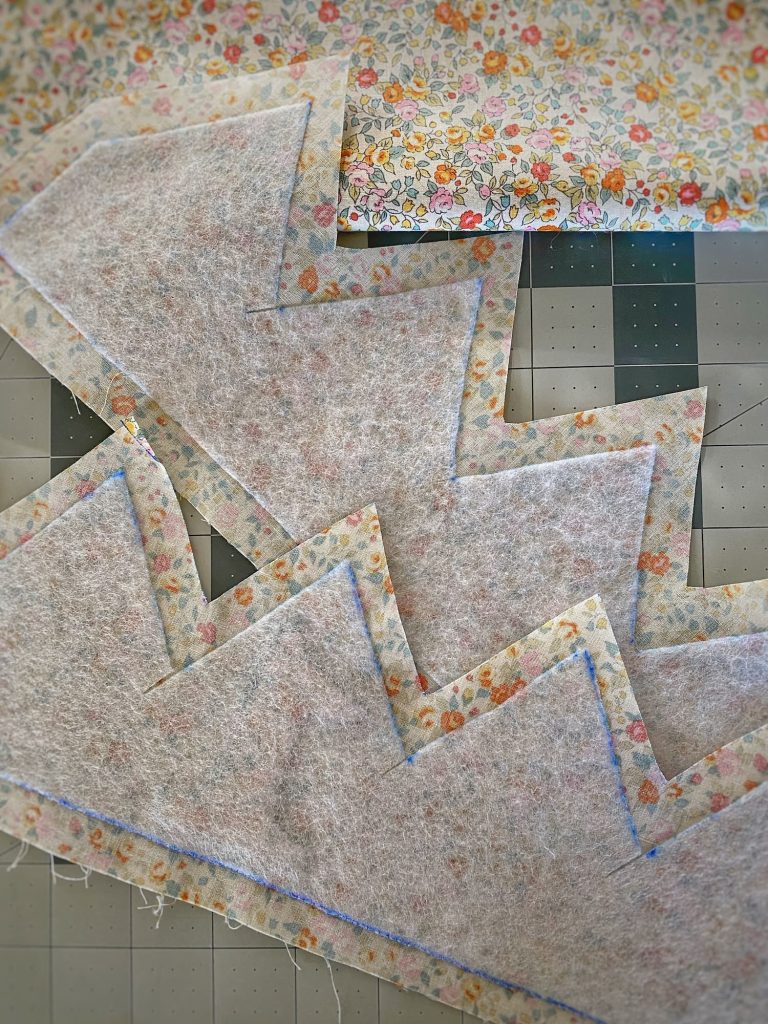
3. Next, following batting directions, use an iron to apply the batting to the WRONG SIDE of both crown fabric pieces. Try to make sure the batting is centered in the middle of the crown, with the 1/2″ seam allowance on all sides.
Now you are ready to sew the crown together!
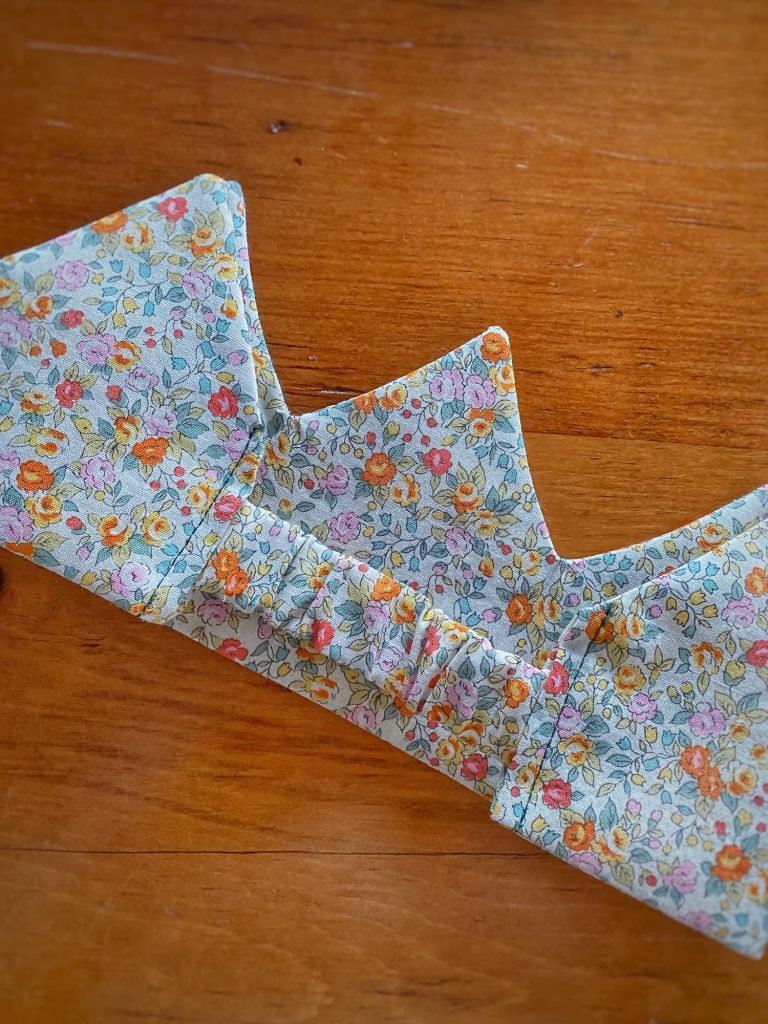
4. Pin the two pieces of the crown, right sides together.
5. Stitch along the top (the points) and bottom, using a 1/2″ seam allowance and leaving both sides open. Your stitching should line up fairly well with the edge of the batting. Try to not stitch over the batting!
Use a backstitch at the beginning and end of each seam to secure it.
Putting the Crown Together
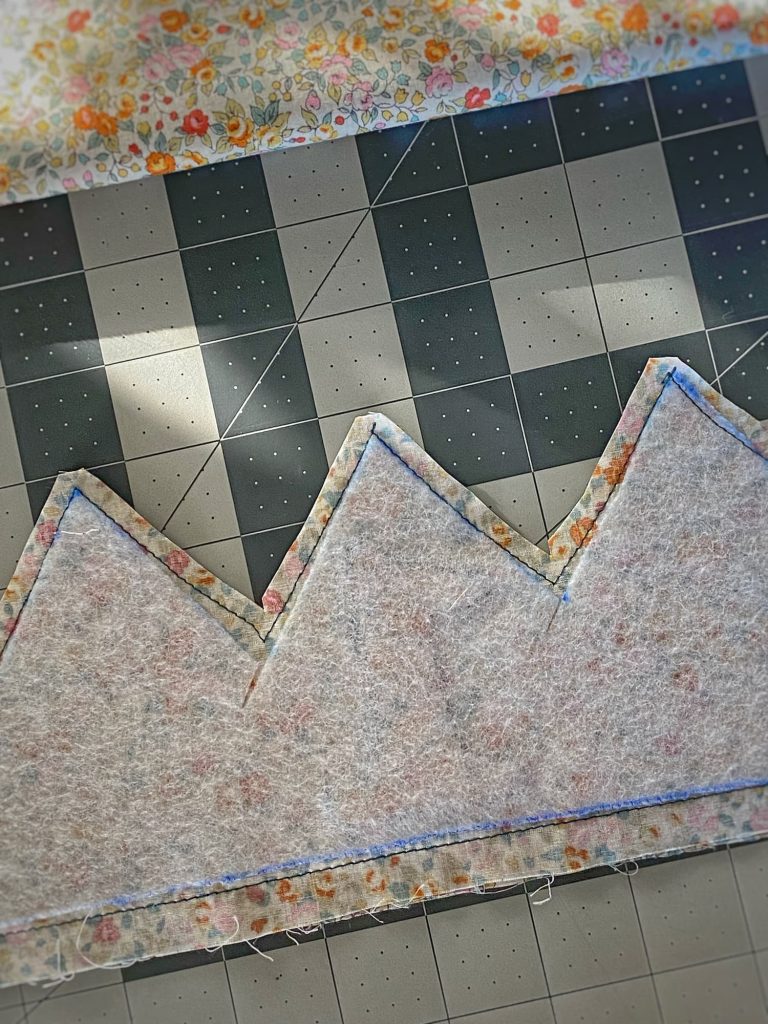
1. Trim the seam allowances on the top/points of the crown close to the stitching. This helps to make the points and valleys lie flat.
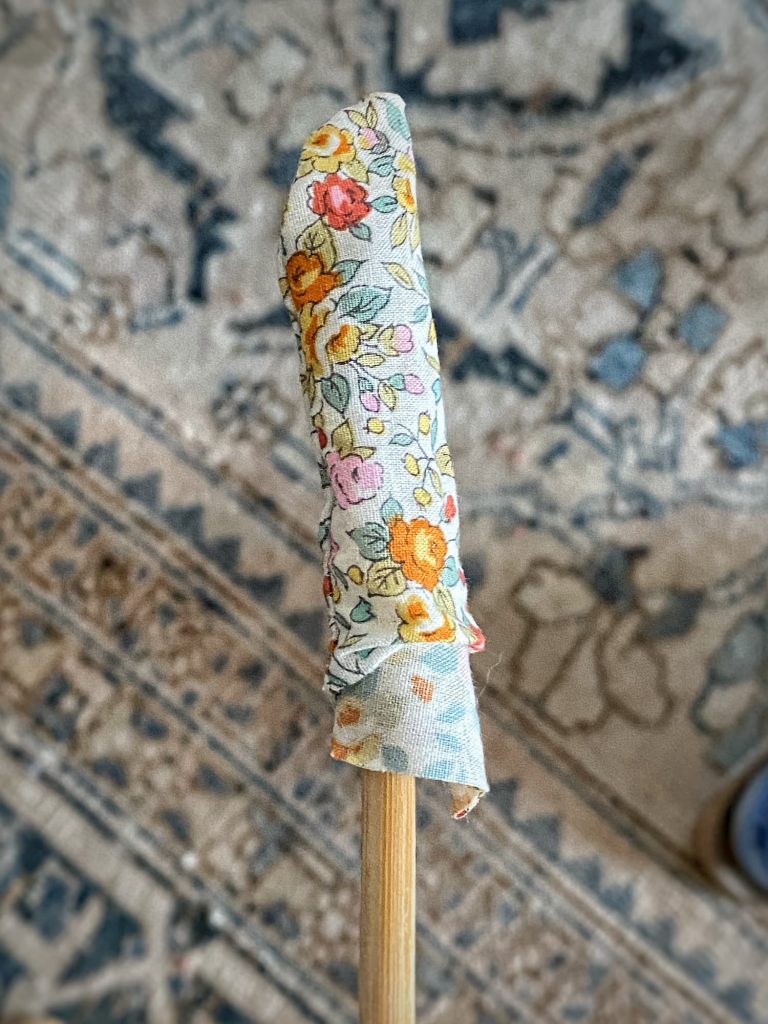
2. Then, using one of the open ends, turn the crown inside out. I used a chopstick to poke out the points and corners of the crown.
3. Fold in the side edges and press the entire crown flat.
4. Admire how cute your crown looks, then get back to work!
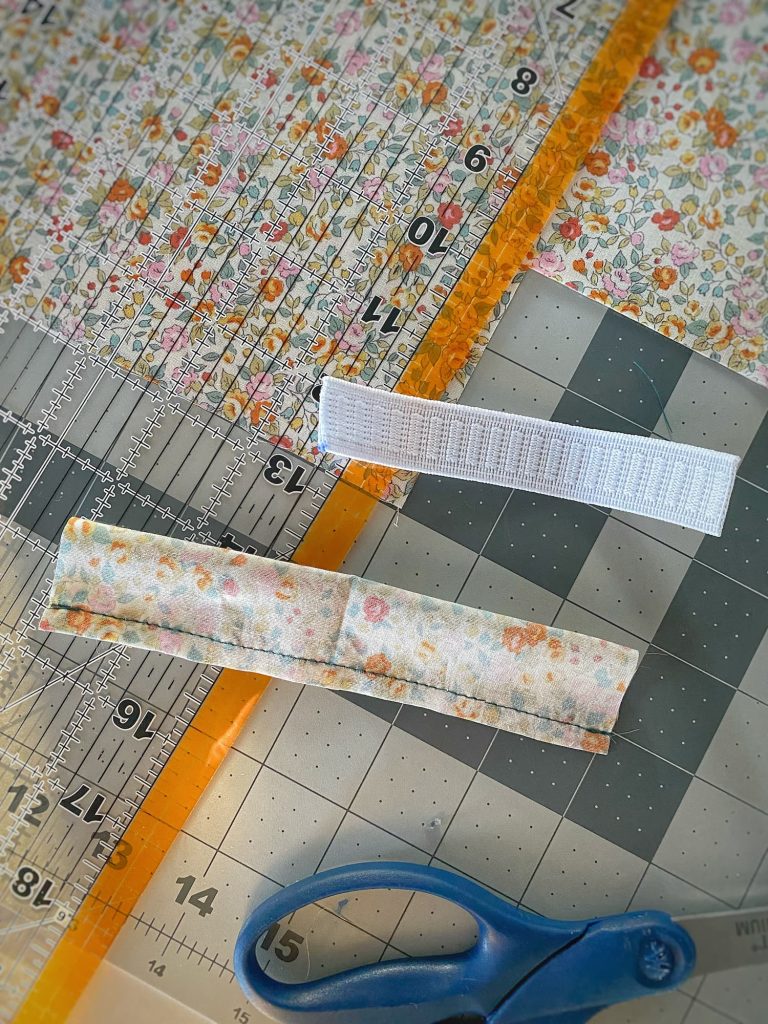
5. Cut the elastic to the desired length. Remember to add an extra 1″ for seam allowances. I used a 4 1/2″ length.
6. Cut fabric to make a casing for the elastic. This should be long enough to allow the elastic to stretch fully. Again adding 1/2″ seam allowances. My piece was approximately 3″X6″
7. Fold fabric in half, right sides together, and stitch along one edge. Turn right side out. I used the chopstick to help with this too.
8. Press fabric flat, with seam in the middle of one side.
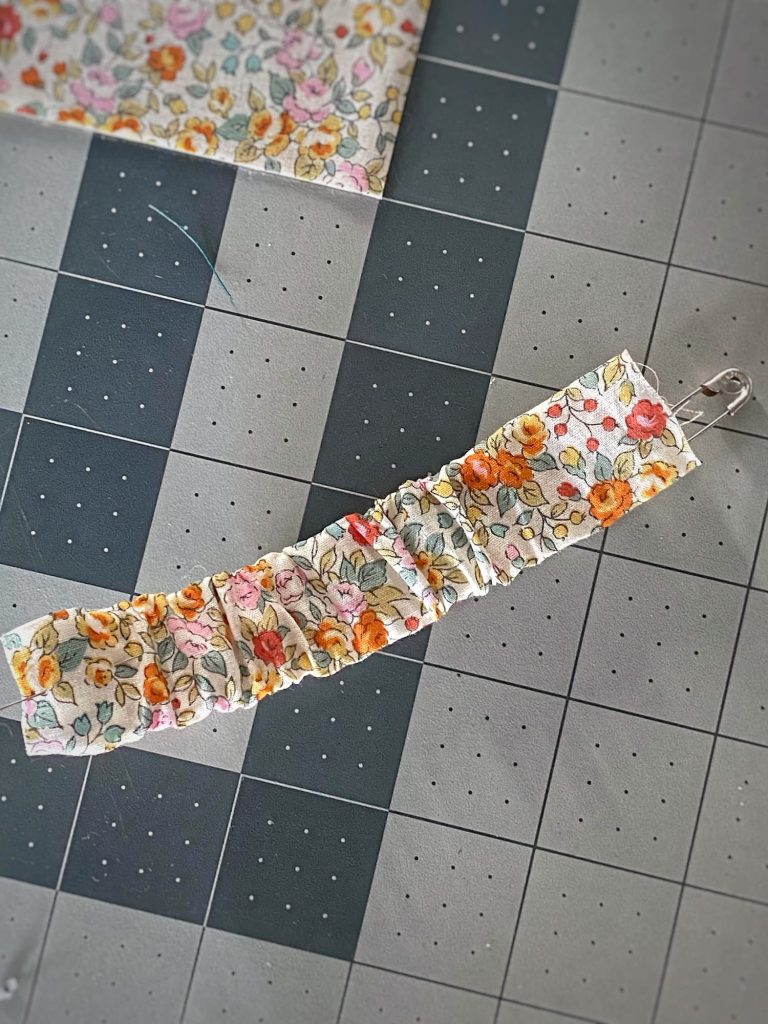
9. Pull elastic piece through the casing. To make this easier, I attached a safety pin to one end of the elastic.
10. Pin ends of fabric and elastic together. The fabric will be slightly gathered. Sew.
11. You are almost there!
12. Pin fabric-covered elastic to the opening of each end of the crown, with the seam facing in. Top-stitch along the edge to close each opening and secure the elastic.
13. Done!
Finishing Touches
I hope you love your birthday crown at this point!
But you can bring it to the next level with a couple finishing touches!
1. I add colorful pompoms to the points.
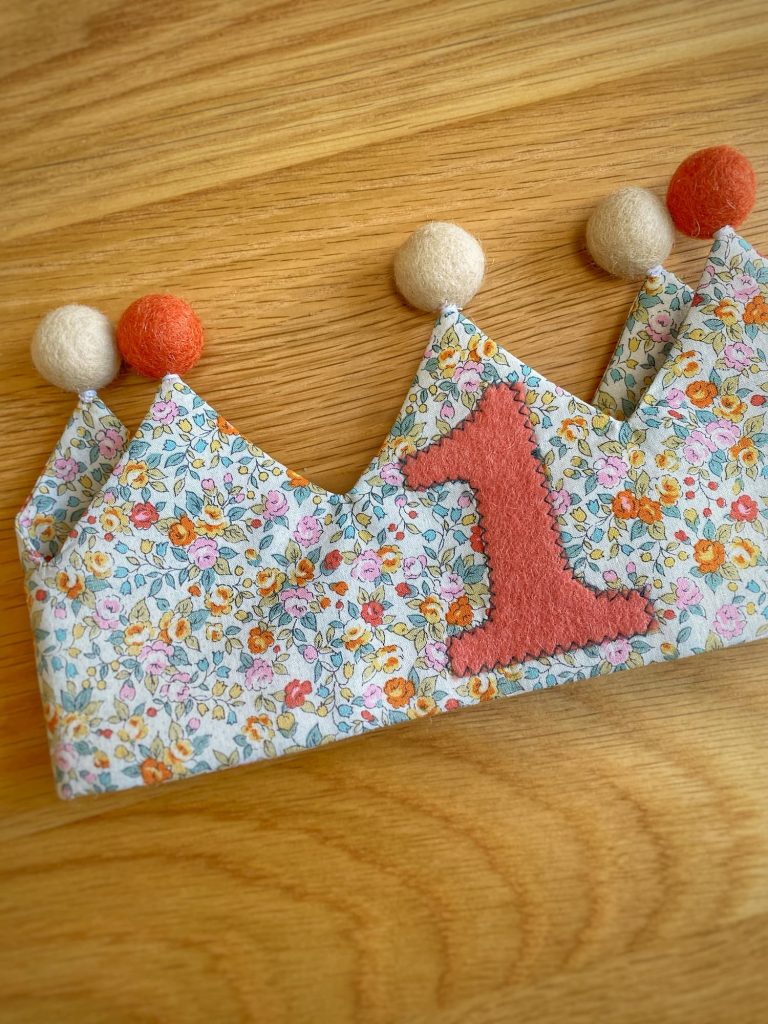
I highly recommend that you use wool felt pompoms instead of less expensive fuzzy ones. For one, they are solid, so you can sew them on securely. And also, they just look better.
I used a 2 cm size for Poppy’s crown.
Shop these choices on Amazon:

2. I embroider the name and year on a piece of felt and attach it to the back of the crown. This way the crown serves as a memento of this special occasion.
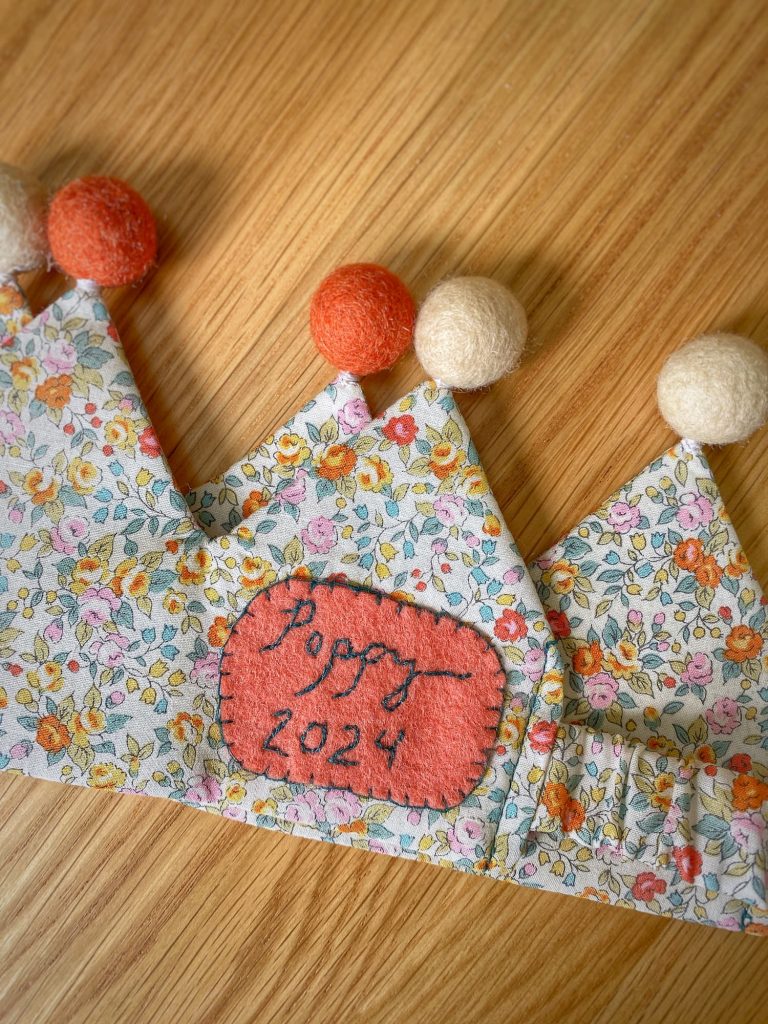
Full disclosure: I have zero experience with embroidery. The first one I did for Jamie’s crown looked like a child did it. I like to think it was quirky in a folk-art way, ha!
With a bit of experience under my belt, I did a much better job on Poppy’s. Still not professional level, but definitely charming!
My personal tips:
- Write the lettering on a piece of tissue paper.
- Pin to the crown and hand-stitch over the tissue paper.
- Remove the tissue paper and then hand-stitch again over the writing for a more finished look.
- I found embroidery floss to be too thick for the small letters, so I just used regular thread.
- Attach the felt piece to the crown by hand using a blanket stitch.
That’s it!
Would you try making a fabric birthday crown?!
For more of my easy sewing fabrics, see my posts: A Cottage-Style Easter Table Setting in Beautiful Blues and Whites and Easy Sewing Projects to Warm Your Kitchen and Table for Winter.
This Week Into Next
I am posting from D.C. this week!
I ended up changing my flight to leave Maine a day early since there was a Nor’easter bearing down on the state, bringing snow, ice, rain, and high winds.
The house sitter says we are getting slammed.
Can’t say I am sad to be missing it. I have had enough with storms this winter.
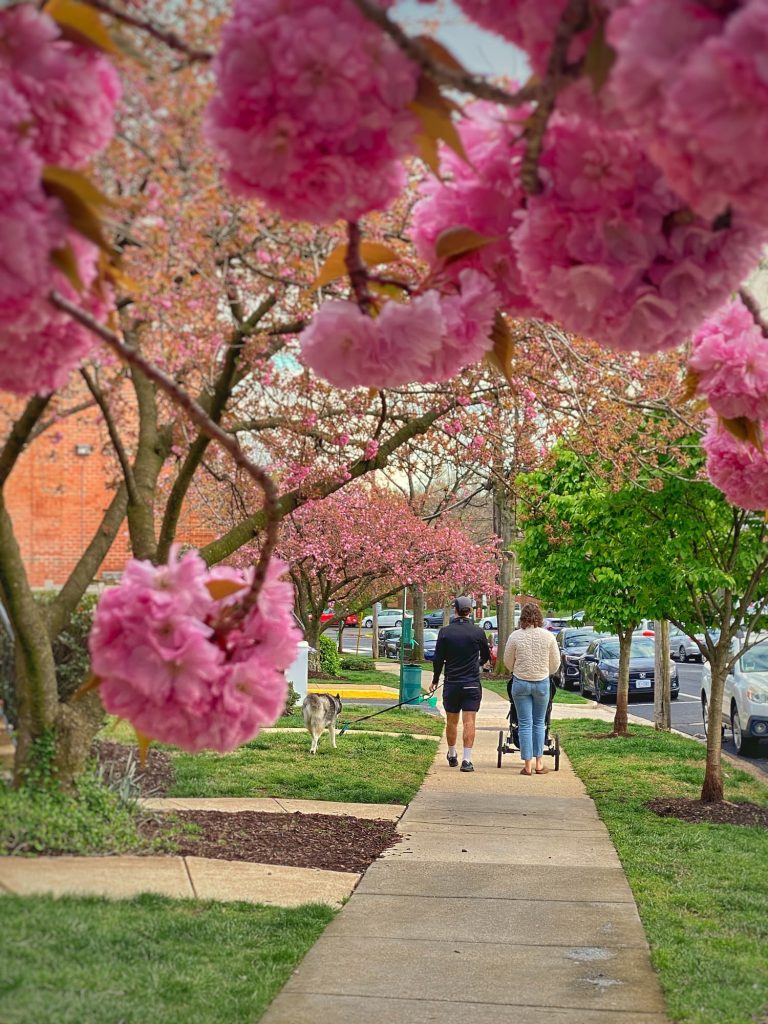
Meanwhile, here in D.C. the crabapple trees and forsythia are in bloom. The grass is green. Some of the trees are getting ready to leaf out. This was always my favorite time of year here.
And, as you know, it is my least favorite time of year in Maine.
Speaking of flowers…
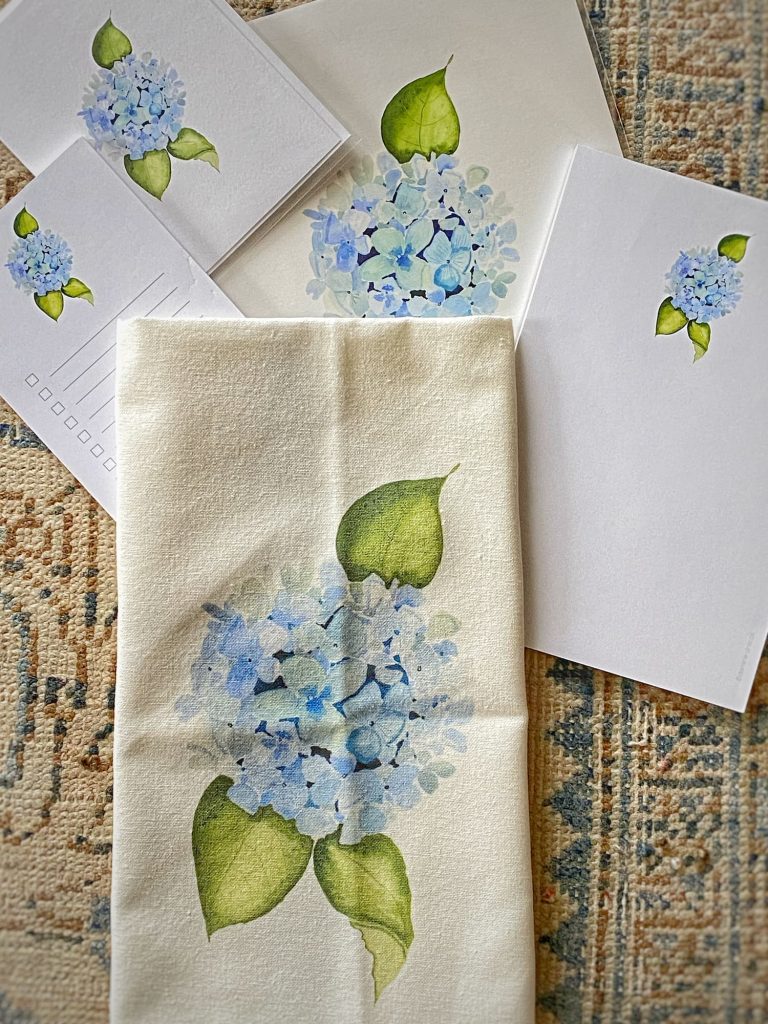
My friend Danielle from Finding Silver Pennies sent me a few goodies from her new Hydrangea collection!
How pretty are these note and list pads, notecard, print, and, my favorite, dish towel?! Danielle creates these designs from her own watercolors. She is so talented!
Danielle has a blog and on-line shop. Plus you can buy fabric, wallpaper, and homegoods in her original designs on Spoonflower!
You can read about her new hydrangea collection and also the hydrangea plants she has surrounding her home in Massachusetts in her blog post Hydrangeas For Your Home.
I have also written a blog post about hydrangeas: How to Grow Limelight Hydrangeas for Beauty All Year.
So much love for those beautiful mop-head blooms!
In Zoe’s Kitchen
I spent Friday in Zoë’s kitchen, preparing 5 Pop of Lemon Poppy Cakes for our little Poppy’s 1st birthday party on Saturday!
Zoë will be sharing this recipe in her newsletter this week, in addition to Martha Stewart’s recipe for baked macaroni and cheese. This super creamy version of classic mac and cheese, topped with buttery croutons, has been a family favorite for years. In fact, Zoë used to request it for her birthday dinner when she was young.
Are you seeing the theme here?
Happy birthday to our Poppy, aka Pops, aka Popsicle, aka Poptart, aka Popstar!
Be well, friends!
Questions, comments, or just want to say hello?
I’m always happy to hear from you.


Oh Molly what precious birthday crowns you created for the grandbabies birthday. You are such a good Mim for passing along family traditions to the next generation. I can’t wait to read the mac and cheese recipe…buttery croutons on top sounds delicious and who can resist anything lemony…it just shouts springtime. Seeing Poppy getting strolled through the neighborhood brought back such wonderful memories for me. My first two granddaughters were born in Alexandria about 8 weeks apart, and they only lived about a mile from each other. I loved visiting and strolling them through those quaint old neighborhoods especially in the spring. Even though I didn’t get to “visit” Maine this week I enjoyed a glimpse of DC. Glad you got ahead of the storm, and hopefully that’s the last one for this year. Safe travels home.
Thanks, Julie! I had such a great trip! I so loved spending time with Poppy, my two daughters, and son-in-law. I even got to see one of my sisters at the party! It was a bit cool, but D.C. still looked beautiful in her colorful spring finery. And yes, I spent hours “strolling” with my kids when they were little!
These are so cute Molly. Love the Pom Pom’s on top 👑
Thanks, Ann! The pompoms add a touch of whimsy, I think!
I am absolutely smitten with your creation of birthday crowns! Smitten- I tell you!!
Aw, thank you! I have so much fun making them. They just make me happy!
Molly, I hope you are having fun in DC! It sounds like the perfect time to be there. Did you grow up in that area?
I absolutely adore the crowns. What a sweet idea. Fun for them and a lovely keepsake! You are talented with the sewing despite what you say.
Have a great weekend !
Hi Kim! No, I grew up outside NYC, but lived in the DC area for over 30 years while I worked and raised my kids. I do have so much fun making these crowns! And I have to say they look adorable on my grandbabies!
Love the crowns so much! Thanks for the tips on how to make them!
Hi Zo! It was so great to spend the weekend with you and celebrate Poppy’s birthday! You are a fantastic mom!
Molly!
Hope you were able to avoid the Nor’Easter and arrive home safely. Did you feel the NJ earthquake?
The first of your birthday crowns are absolutely delightful. I imagine Jamie and Poppy anticipating their new crowns for many years to come..
I’m loving your blog from my home on Mercer Island just east of Seattle. Nestled into an retirement apartment/community on Lake Washington, I find inspiration each week for blues and whites which I too, love.
Spring is coming,
Diney
Hi Diney! I did avoid the Nor’Easter, though it was a bumpy flight to D.C. last week… I did not feel the NJ earthquake. And thank you — I love to make the birthday crowns. We will see how many birthdays before my grandchildren no longer want to wear them, ha! I am so happy you enjoy my blog. Sounds like you live in a beautiful area too! What’s not to love about blue and white?! I hope you are having a lovely week!
oh, Molly, these birthday crowns are just so sweet. It reminds me of something from an English picture book. Birthdays are so special and I know your grandbabies will treasure these crowns. 😊 Thank you for mentioning my hydrangea collection. You know how much I love them and I’m eagerly awaiting their arrival. Cold, wet & maybe snow here…. Happy Spring xx
Thank you, Danielle! Making these crowns, and thinking of my grandbabies, brings me so much joy! I just put your dish towel out today. Another stormy wet one here today… Spring will be here eventually, as it always comes…
You are certainly a very good sewer no matter what you say! I can’t believe you can make such cute crowns for your grandkids – entirely from scratch! They are really amazing. It is nice for you to get some spring to get you to spring in Maine. I think you will have to make a habit of it. I hope the lower garden got through the storm without too many items and seaweed strewn about. Looking forward to seeing your view when you return! Have fun with Zoe, Sam and Poppy!
Amy
PS how nice that Leah was able to make it too!
Thanks, Amy! I have so much fun making them. Still need to work on my embroidery skills, ha! Yes, it was nice to see the flowers in DC. We didn’t have flooding with this storm, so all was good! And it was wonderful to see Leah. And Lissa too!
Molly, your birthday crows are the sweetest. You’re the best Mim ever. Glad you escaped to clearer skies. Enjoy! xo
Hi Juliet! I had so much fun making the crowns. Don’t know how I will feel about it when I have more grandchildren, haha. By then I will be able to whip them out in no time. Maybe I will also become a pro at embroidery too. 😉
What fun! I think the crowns are such a great idea. Fun item for dress up and as a memento. Perhaps your grandchildren will have your children (or you) add a new name tag to the crowns each year for your great grandchildren and have the tradition continue using the same crown.
Dani is such a good artist and how nice of her to share her hydrangeas. She’s lovely.
Our weather is typical spring. Changeable, unpredictable…Wet, dreary, and sunny.
Thanks, Karen! It would be fun to have them go through another generation. We will see if they make it through this one, ha! And yes, love Danielle! So sweet and so talented! We have had two lovely days here in a row. Then back to the 40’s… Have a great week!
Oh my goodness. This is so adorable, Molly. I am excited to feature it in my weekly recap post tomorrow.
Hi Jen! Thanks so much for sharing in your weekly recap!
These are so so cute! How did you attach the pom poms?
Hi Jennifer — Thank you! The pompoms are felted wool, so I just sewed them on by hand.