Creative Wall Decor Part 1: Art and Gallery Walls
Part one of a two-part series on creative ways to decorate your walls. This week let’s chat about how to add personality to your home with art and gallery walls!
Adding Personality to Your Home With Wall Decor
I am not a minimalist. Surprise!
I favor a home layered with a curated collection of items that together weave a story of person, place, and time.
Wall decor is an important thread in this story.
This week in the first of two blog posts on creative wall decor, we will chat about how art and gallery walls lend personality to a space. How they add layers of color, texture, and pattern and further the story of your home.
What to hang on the walls could be the first decision you make when decorating a space, serving as an inspiration for the colors and mood of a room.
Or it might be the finishing touches you add to a room to complement the furnishings.
Sometimes it is the cherry on the top — that statement piece that brings everything together.
Or maybe it is a quiet little treasure that creates a small moment in a larger space.
That is the great thing about art — it can be so many different things!
Choosing Art For Your Home
Whatever purpose a piece of art serves, the most important thing is that it speaks to you!
I have found art for my home in many different places — galleries, antiques stores, auctions, and online sources such as Etsy.
Once I even painted a piece that hangs above the living room fireplace every summer. (You can see it further below.) It is very basic! I am certainly no artist… But maybe you are!
You can pay big bucks for something significant or find a piece for a song at a thrift store. There are also so many great printable options that you can download for free these days. I have even seen some people frame a piece of wrapping paper!
Photos of your family are always a sweet personal touch.
Be sure to keep your mind open! Sometimes art isn’t made out of paper or canvas!.
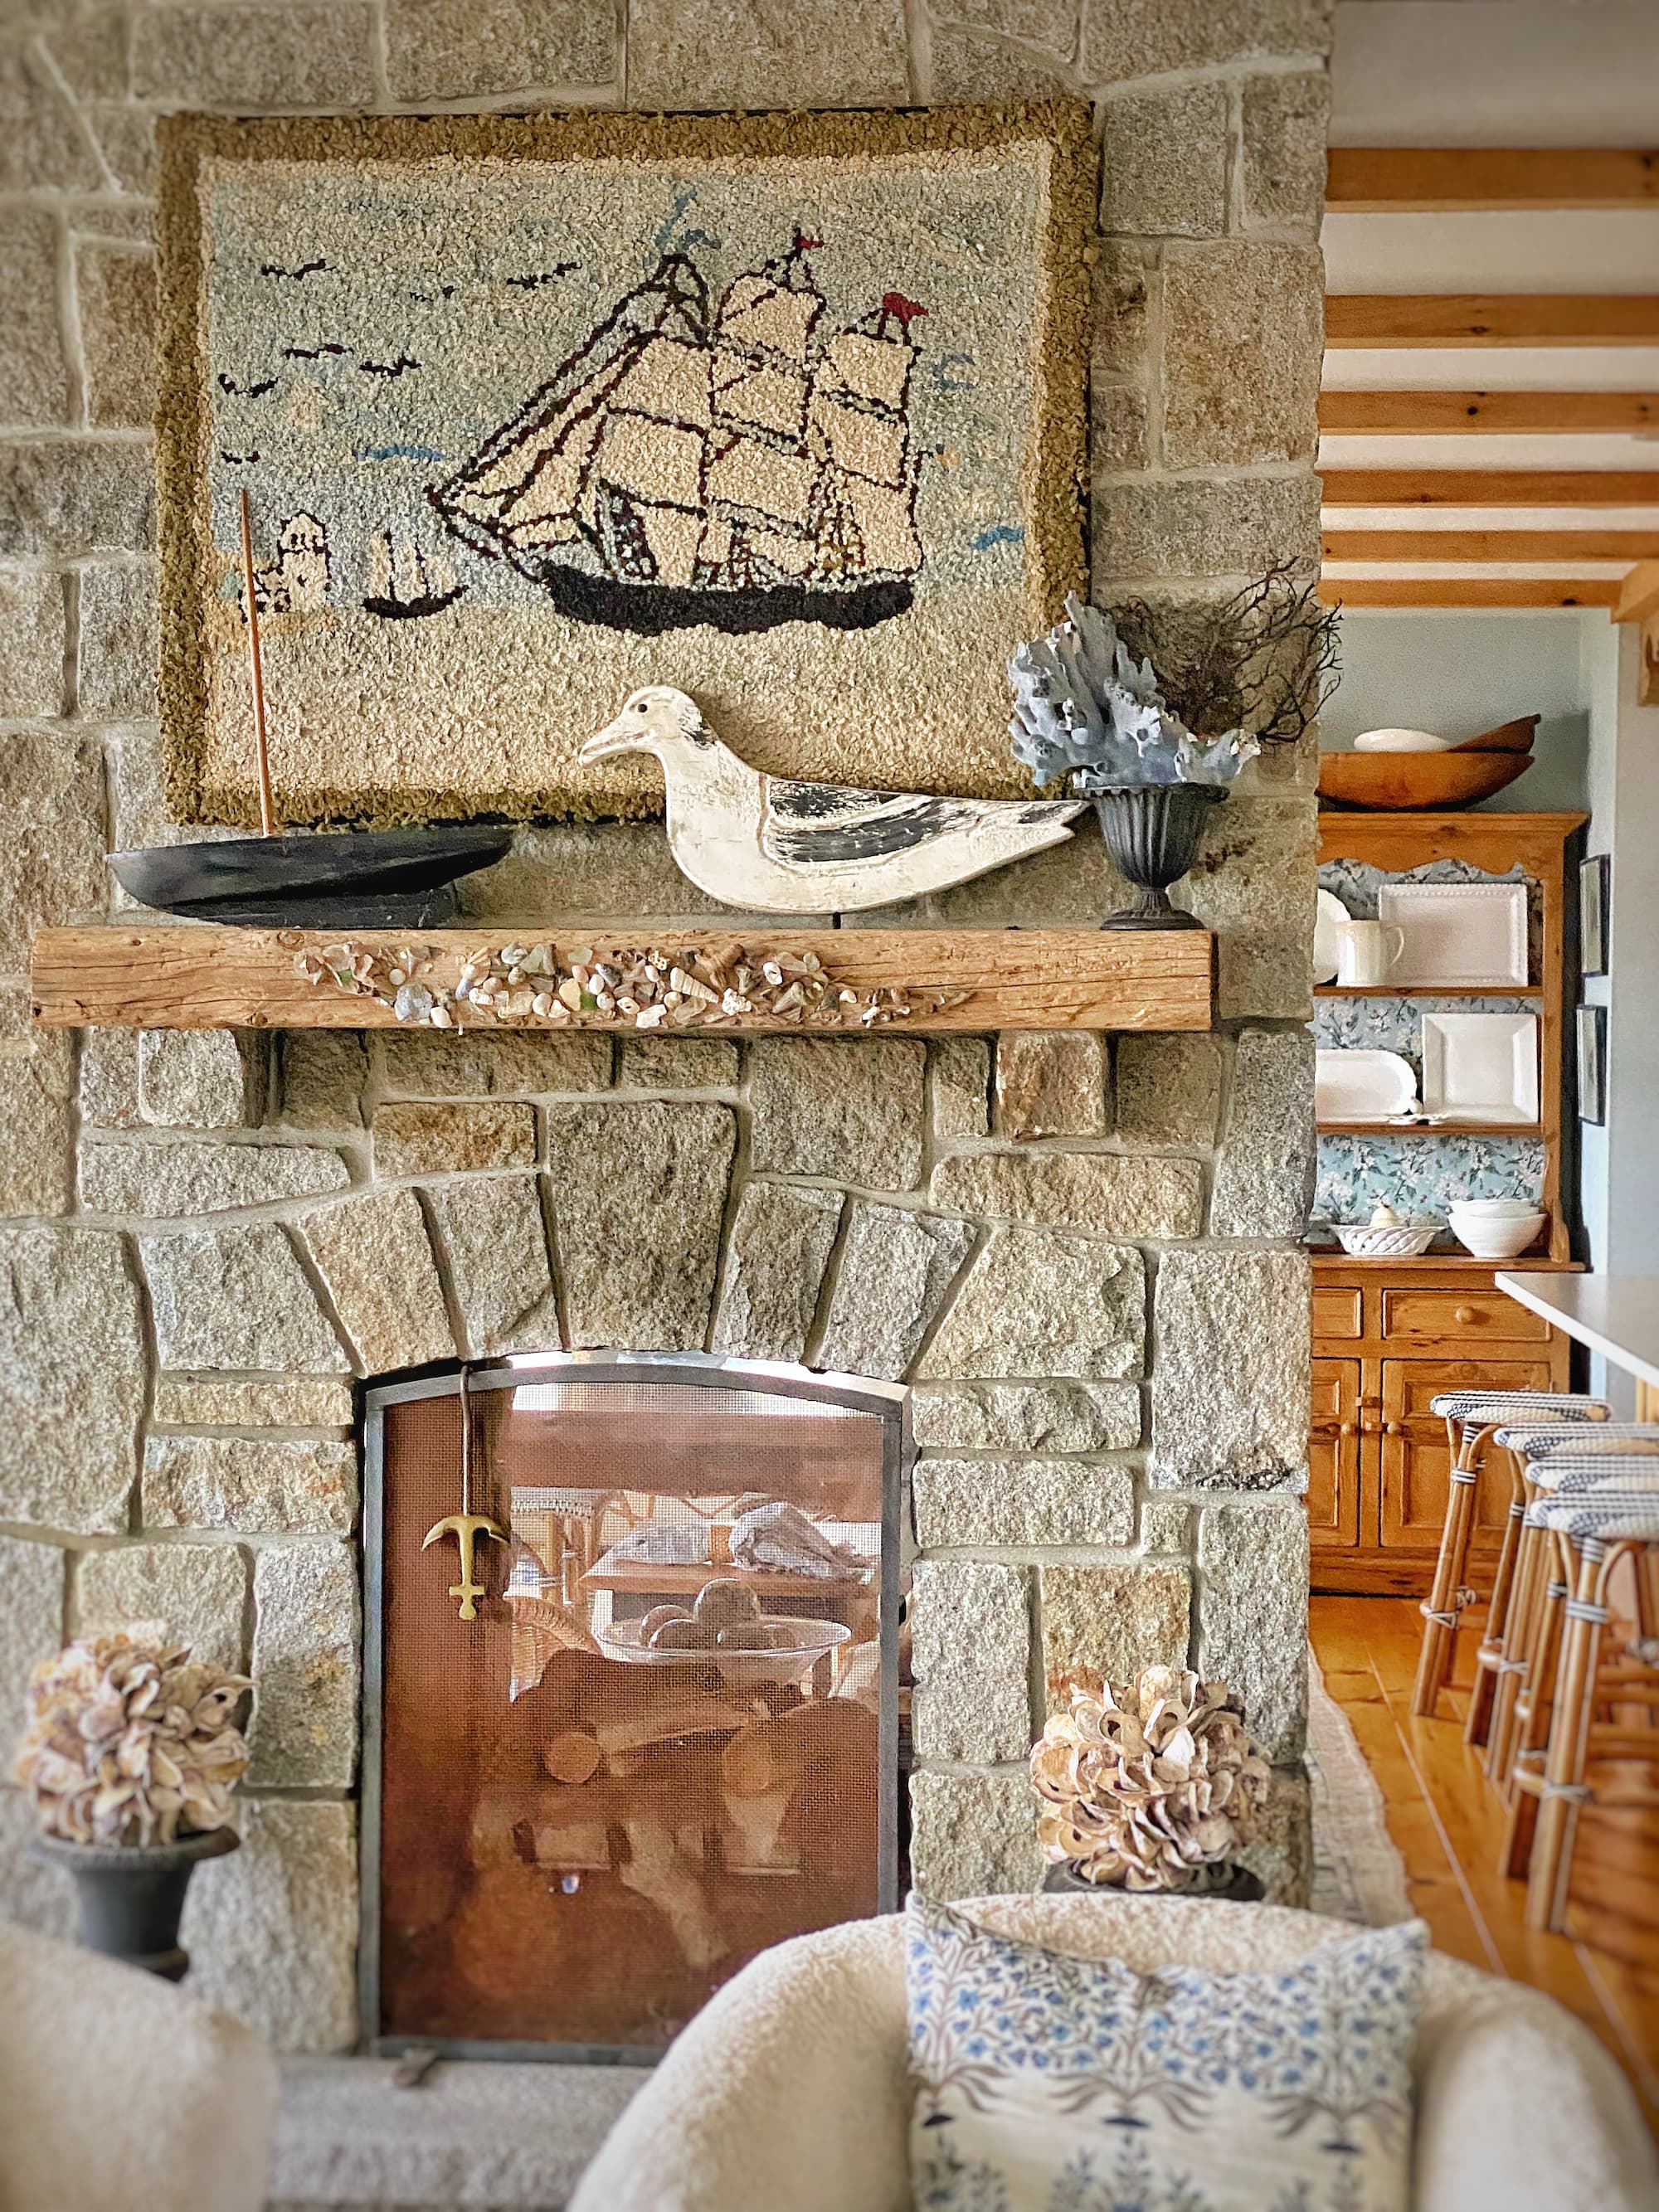
I am getting ready to bring out this sailing ship hooked rug as part of my early spring mantel display.
And my collection of sailors valentines — intricate designs made out of tiny shells — was the very first thing I hung on the walls here in our Maine house. (I promise one day I will do a blog post on just these treasures!)
It bears repeating: as with everything that you bring into your home, choose only artwork that resonates with you in some way!
Where To Hang Art
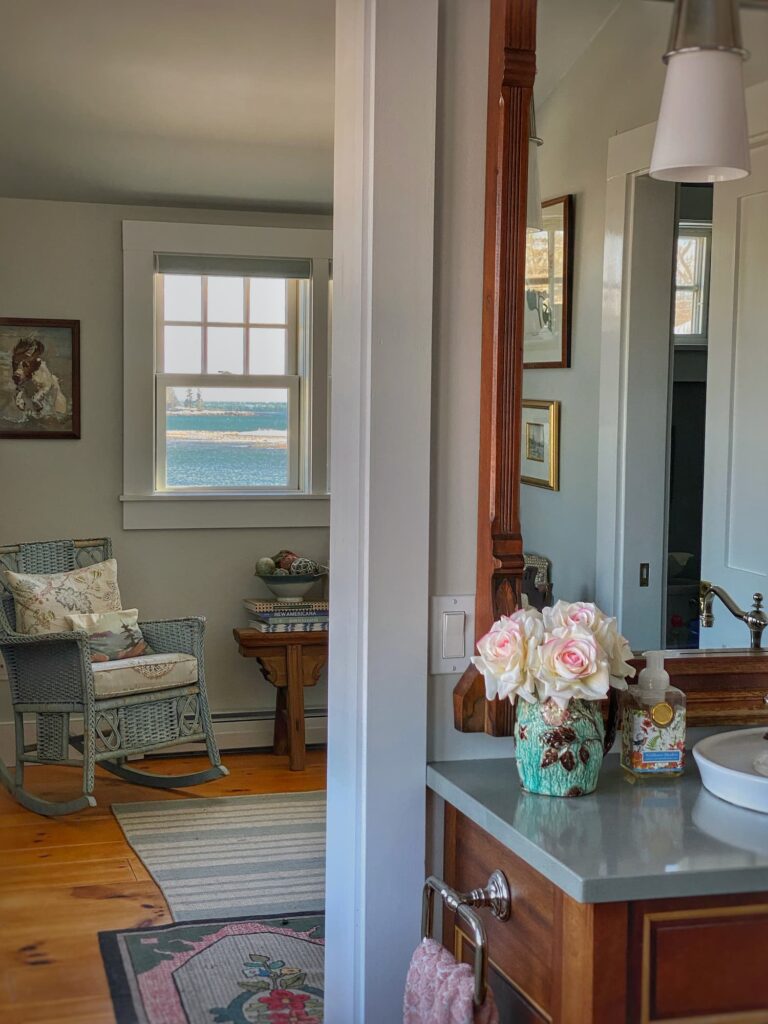
I am of the firm belief that art can and should be hung in every room in the house!
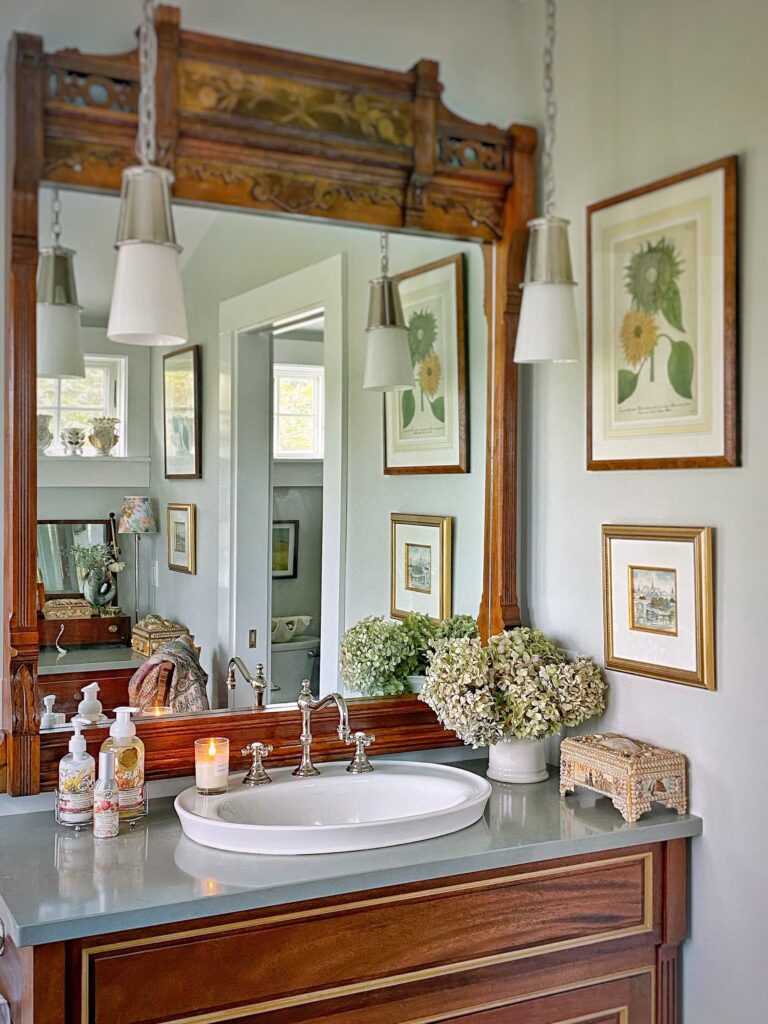
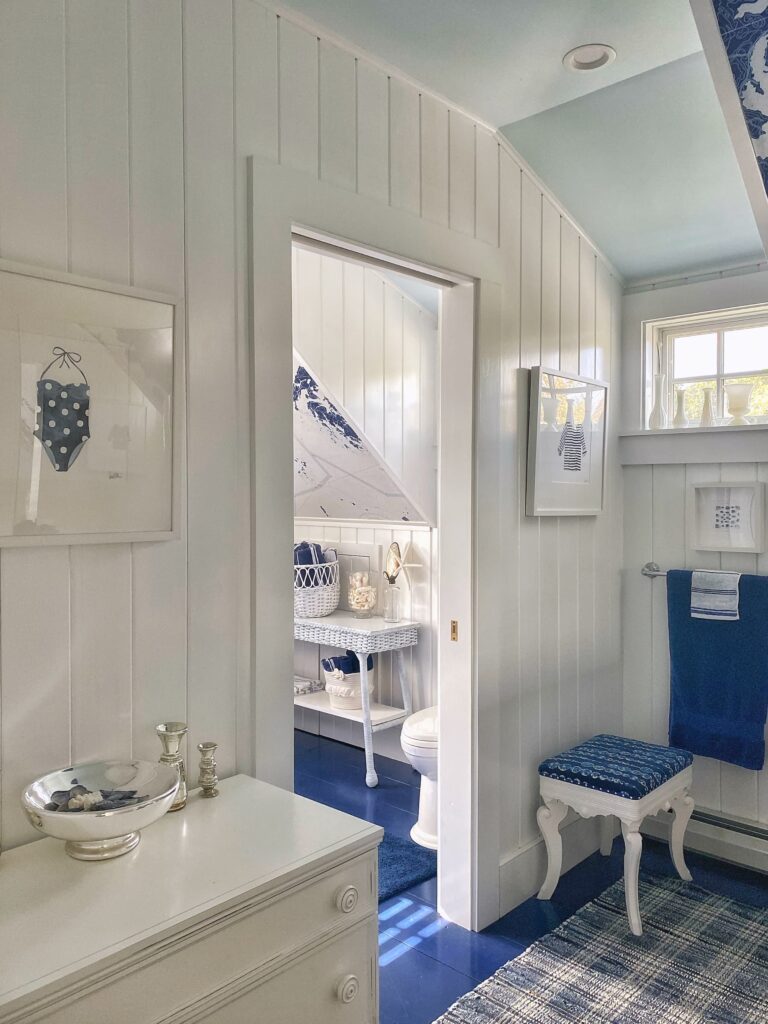
Yes, that includes the bathroom!
And definitely the kitchen! I have a pair of small prints hanging next to one of the cabinets. I have also seen people display artwork on their range hood. If you have open shelving in your kitchen, tuck a small piece in next to your dishes!

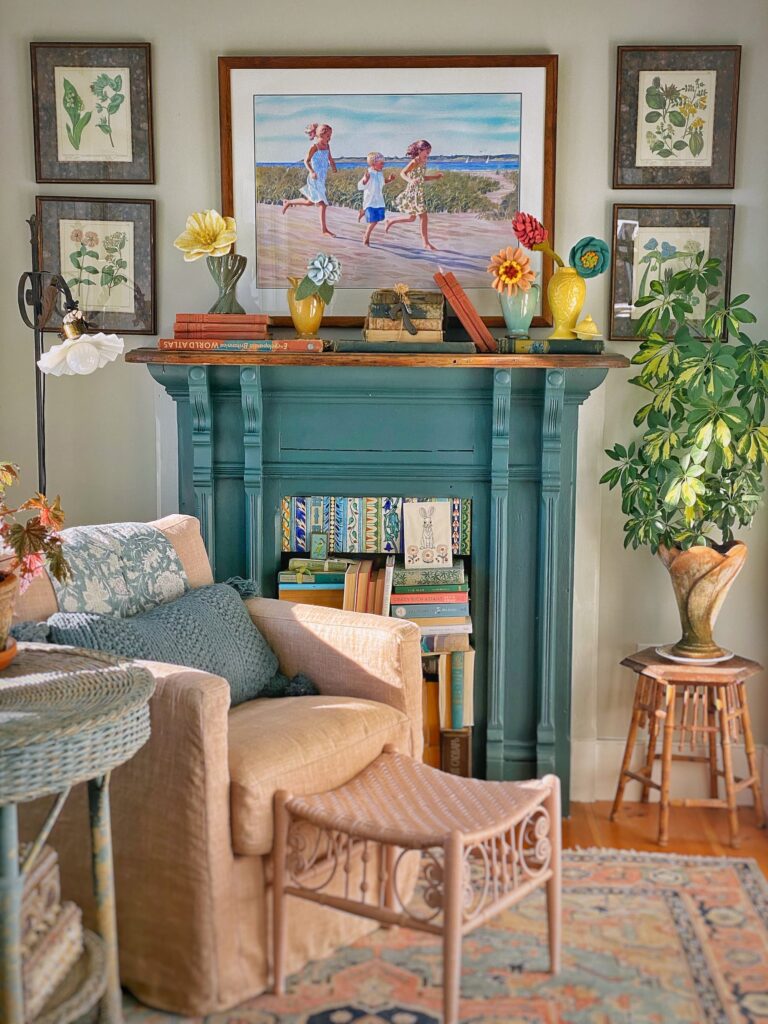
Artwork over a fireplace mantel is a classic option. I couldn’t decide on a single piece of art to hang over the living room mantel, so I switch it out seasonally. (That is another great thing about art — unlike a furniture piece, it is easy to change when you feel like it!)
My son-in-law insists that nothing hang on the wall above the beds in their home. He worries that it could fall off and hit them on the head while they are sleeping.
I obviously don’t share his concern, because I think the space over the bed is perfect for a gallery wall! I have them in each of the bedrooms. In combination with the headboard, it creates a wonderful focal point in the room!
How To Display Art
This brings us to the topic of how to display your art.
You can hang it on the wall singly or in a casual grouping.
A more formal grouping, or gallery wall, makes a great statement.
The easiest and most flexible way to display art is to simply lean it against the wall when placed on a bench, table, shelf, mantel, or even the floor if it is a large piece!
I have displayed art in my home in each of these ways. Let’s take a look at some of them!
Gallery Walls
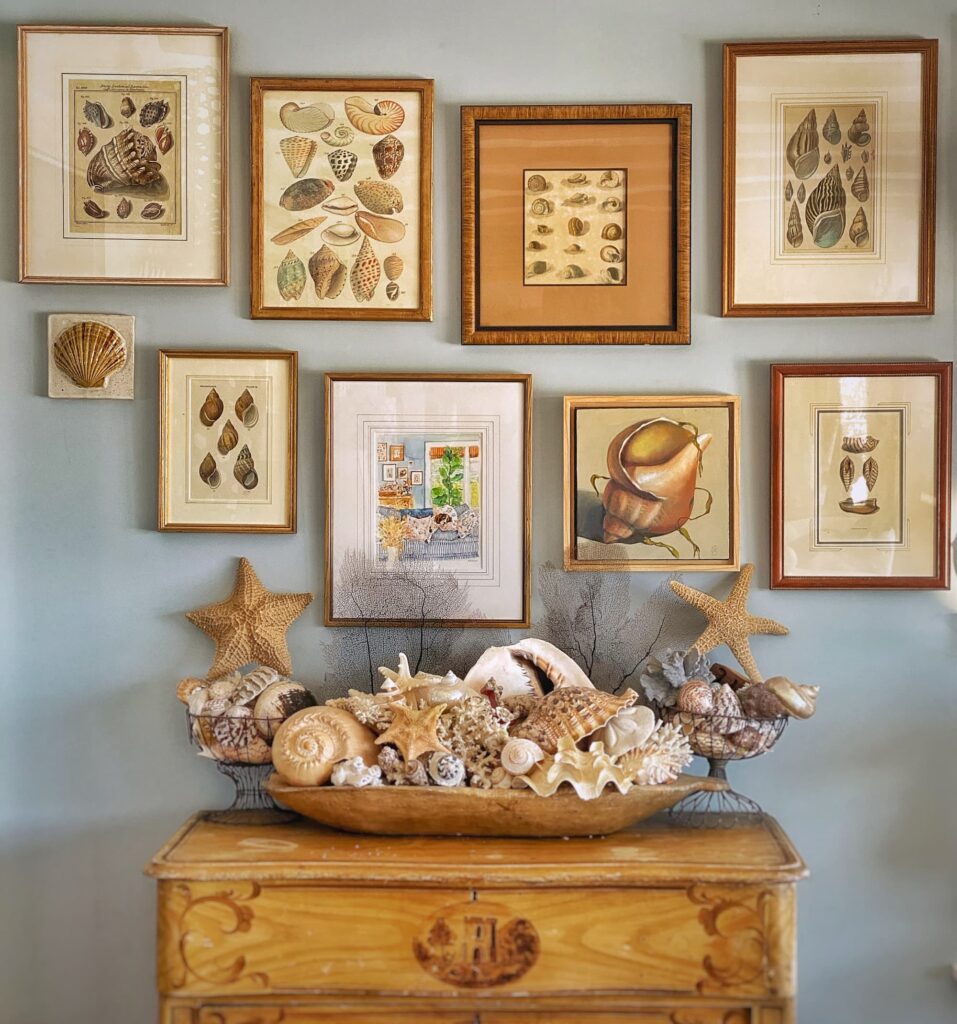
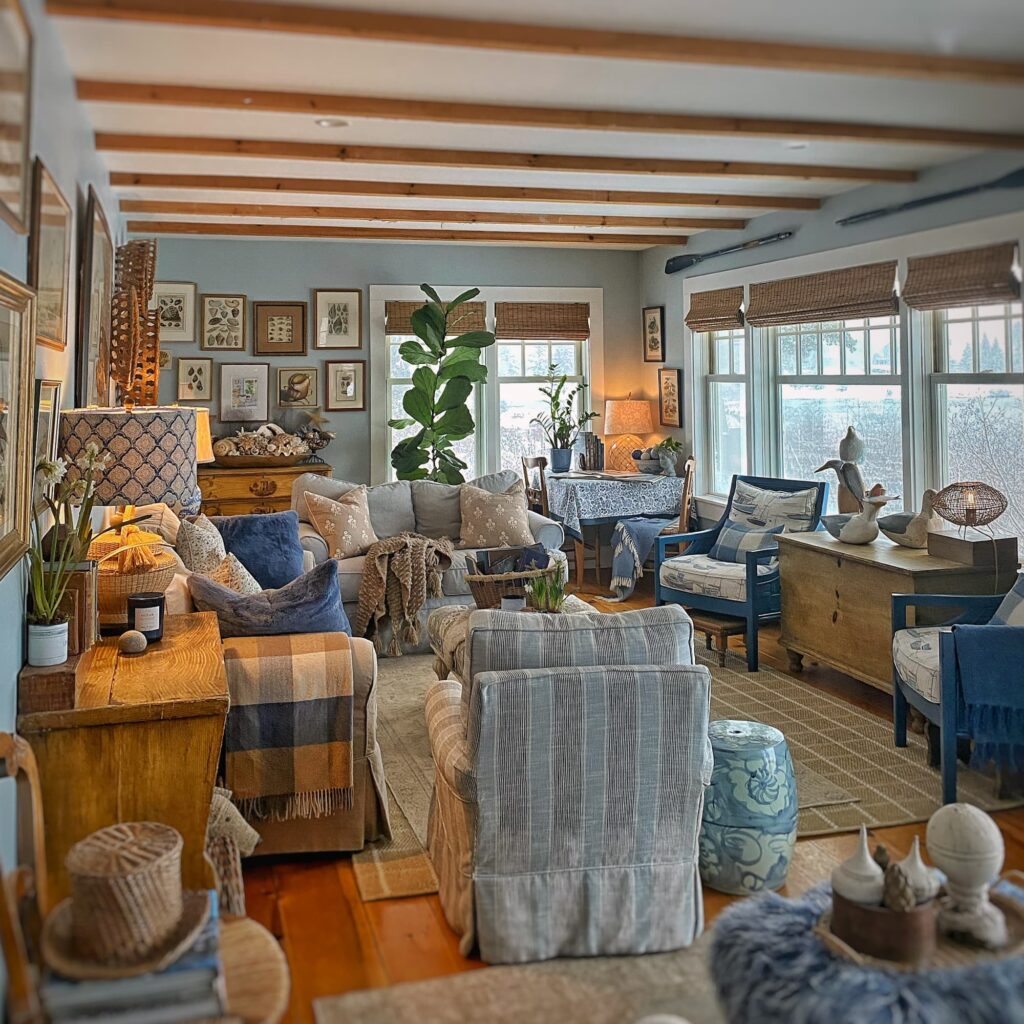
One of the most popular areas of my home on Instagram is the “shell corner” in the living room.
I mentioned earlier that the sailors valentines were the first thing I hung on the walls here in Maine. This gallery wall of shell artwork was the second. It has evolved a little over the years as I have added a couple pieces and rearranged things a bit. But mostly it has stayed pretty much the same.
Someone once commented on Instagram that she thought this gallery wall was “bad” and proceeded to instruct me on how to do it correctly — everything lined up and spaced evenly. This way, she said, I would end up with a more beautiful and professional arrangement.
I had to laugh! I know very well how to do a symmetrical arrangement. And I had purposely chosen to hang this one in a more fluid asymmetrical pattern.
I tend to prefer the casual look and energy of an asymmetrical arrangement.
It is always a little unexpected and more fun.
That is not to say that I don’t have symmetrical arrangements in my home. I encourage you, though, to shake things up a bit and try a little asymmetry in your life. You might enjoy it!
Symmetrical Arrangement
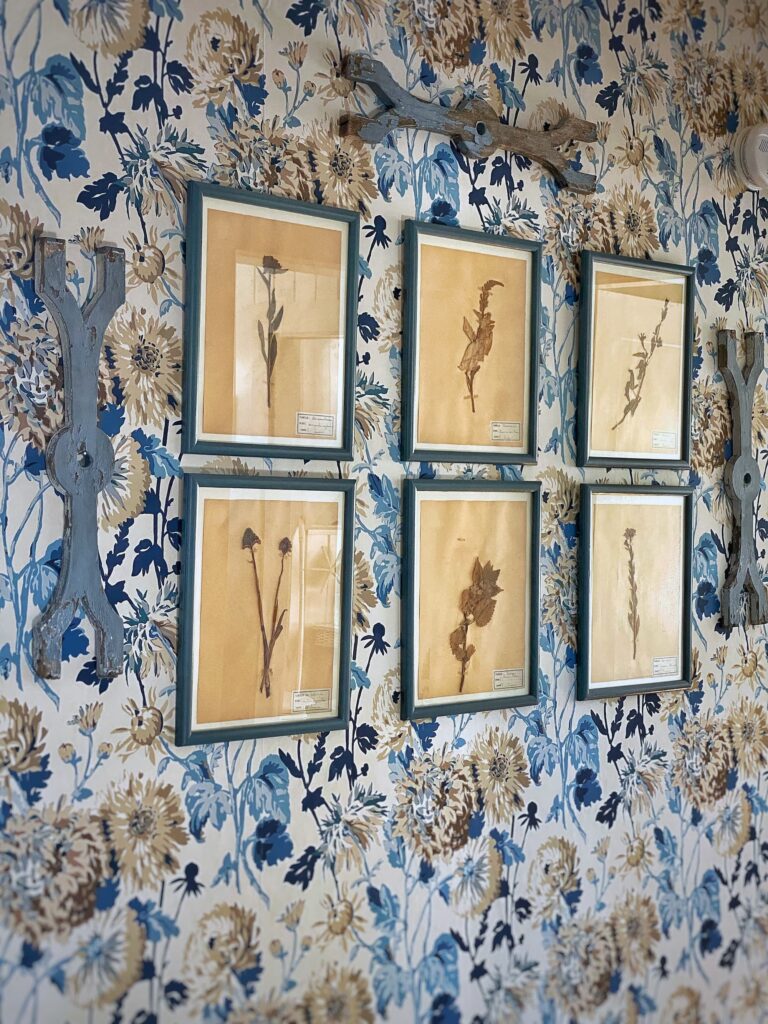

These vintage pressed botanicals are proof that I do know how to do a perfectly symmetrical gallery wall! 😉 I got them at a local antiques barn already framed, something I love about vintage art! All I did was paint the frames blue before hanging them on the wall. I like how they coordinate, but don’t compete, with the floral design of the wallpaper.
The blue painted architectural details were a later addition to further define the grouping.
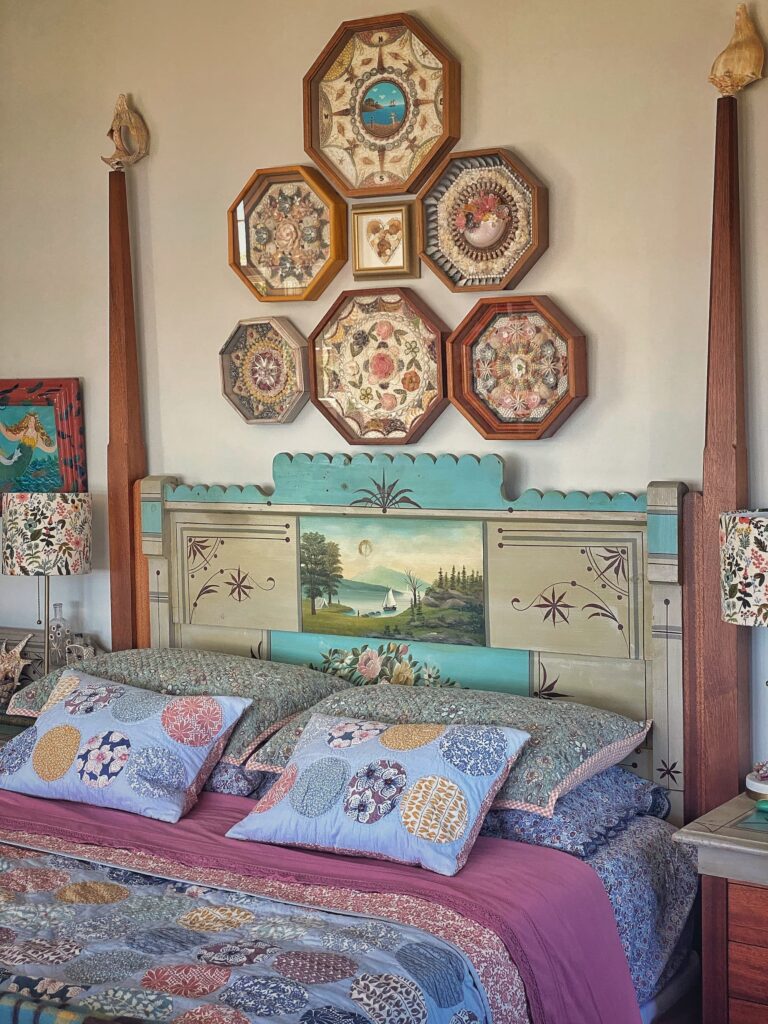
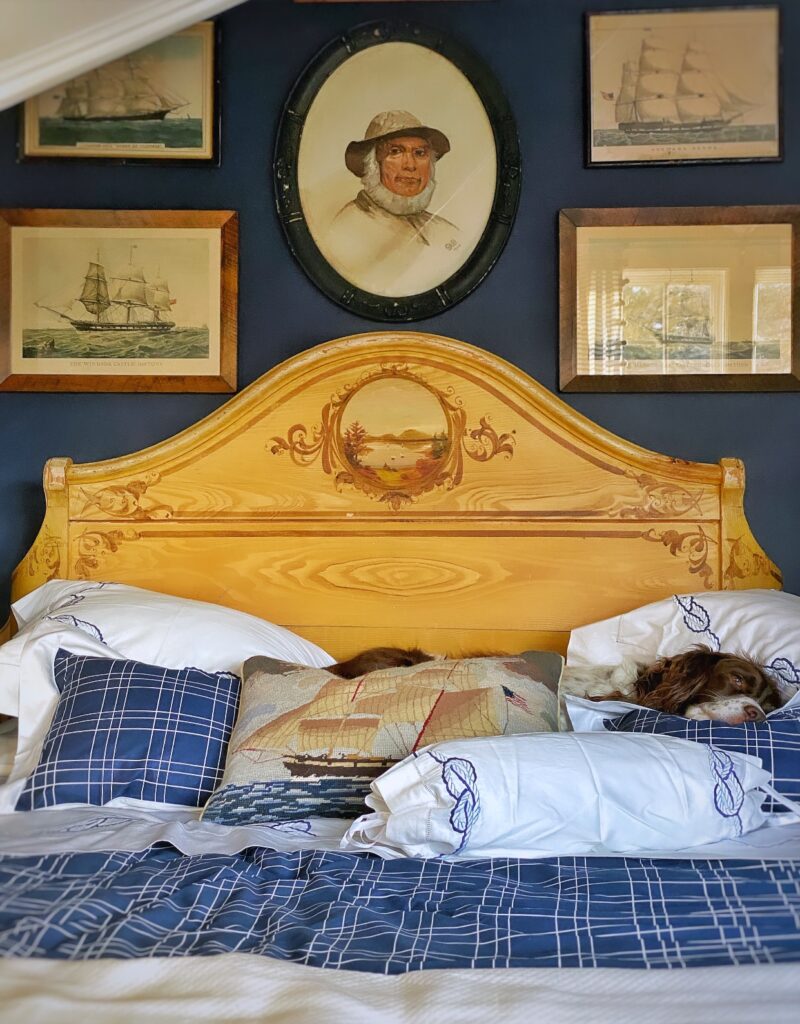
The watercolor painting of our kids when they were young hanging over the mantel in the primary bedroom is obviously a treasured piece.
I added two symmetrically arranged antique floral engravings on each side of the watercolor to frame it and fill out the wall.
Asymmetrical
The apple doesn’t fall far from the tree!
My daughter Leah created this asymmetrical arrangement over the fireplace in her home. I love how she combined a mix of sizes, shapes and medium. The two prints and the plate on top were my mother’s. Leah and I were together when she bought the photograph of Acadia National Park here in Maine. And she took the photo of the hydrangeas herself for a college art class. The engraved botanical on wood and small painting on the mantel leaning against the wall add even more interest to the grouping.
Great job, Leah!
I will be talking more about asymmetrical arrangements next week in part two of this series all about decorating your wall with objects that are not technically “art”!
A Casual Grouping
The Living Room
This casual grouping of antique and vintage art came together over time, as I found pieces that spoke to me.
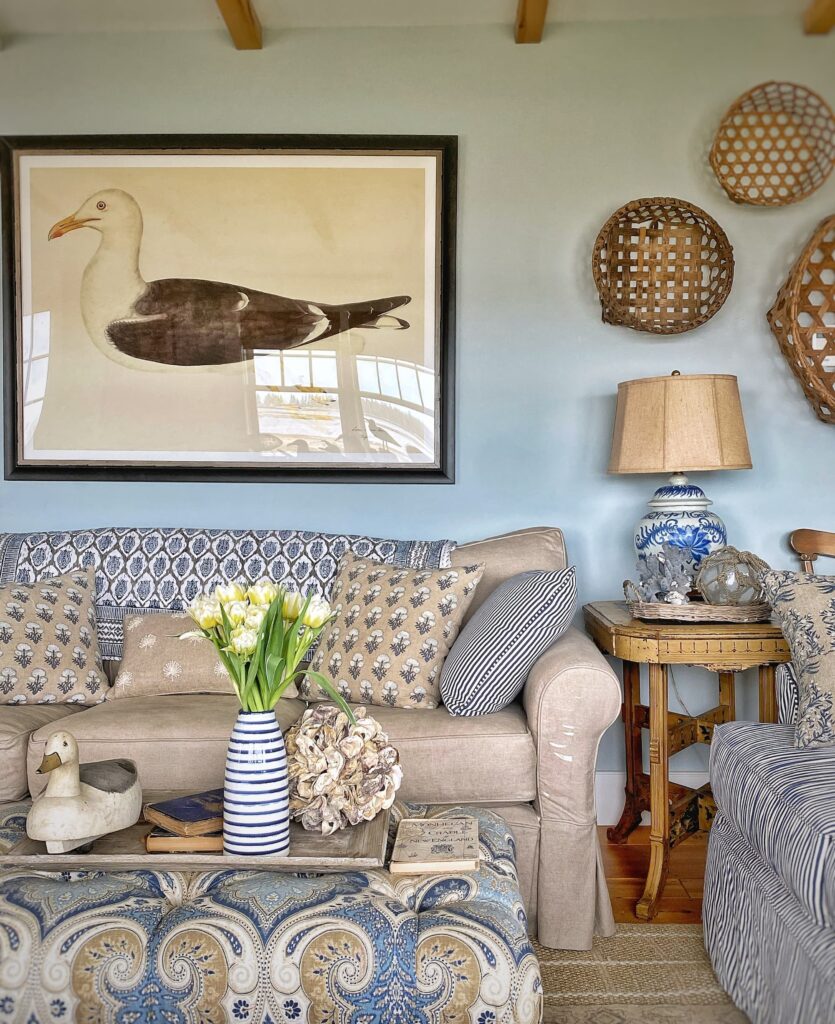
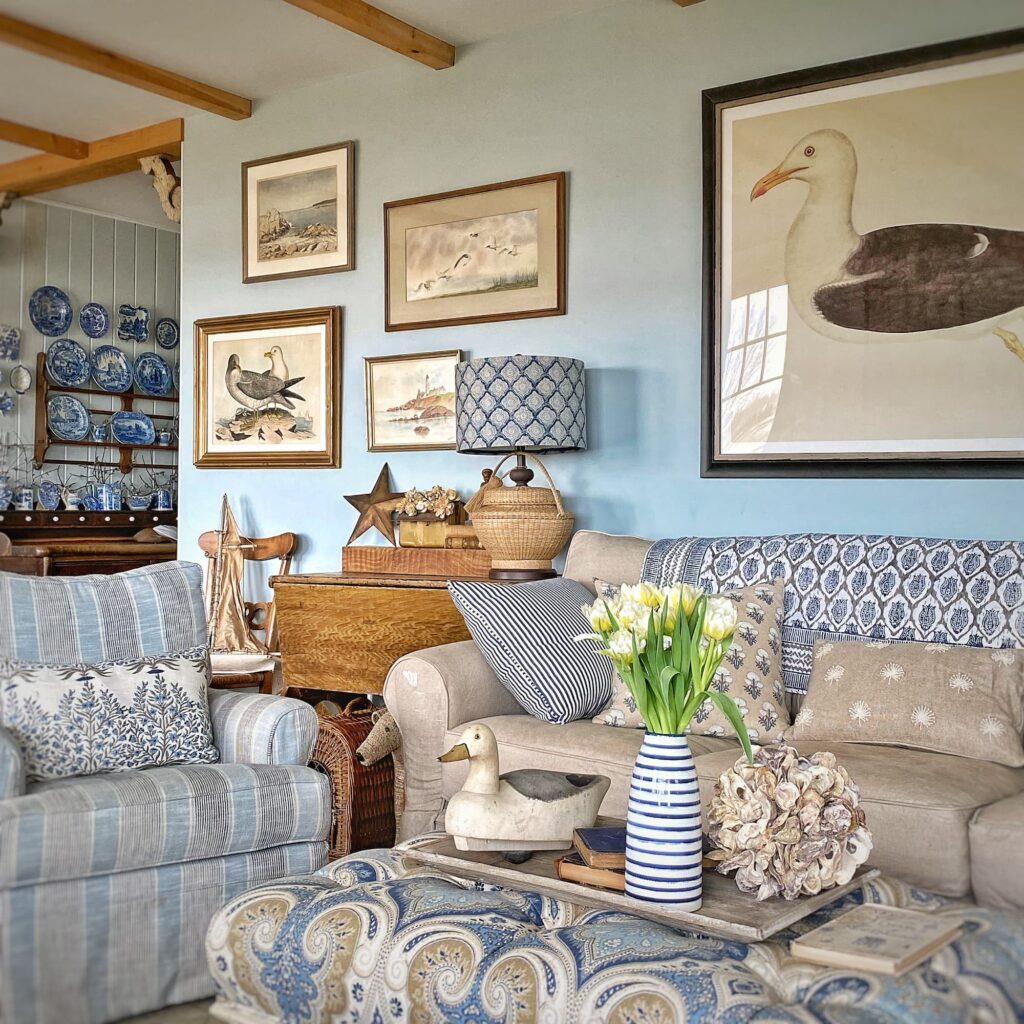
The antique seagull lithograph came first. I had to sit almost through to the bitter end of a long auction, but I was determined to make it mine!
The coastal scene on the top left was an antiques store find.
I’d had my eye on the vintage seagull watercolor at a local store for a while, and thought it would look good with the other two pieces.
And then when I rearranged everything, I had a gap…. So I went out looking for something to fill it and came home with that sweet little primitive vintage lighthouse watercolor.
All pieces came framed and ready to hang! Don’t worry if you don’t like the frame — a little paint or some Rub ‘n Buff can easily change its look!
The Den
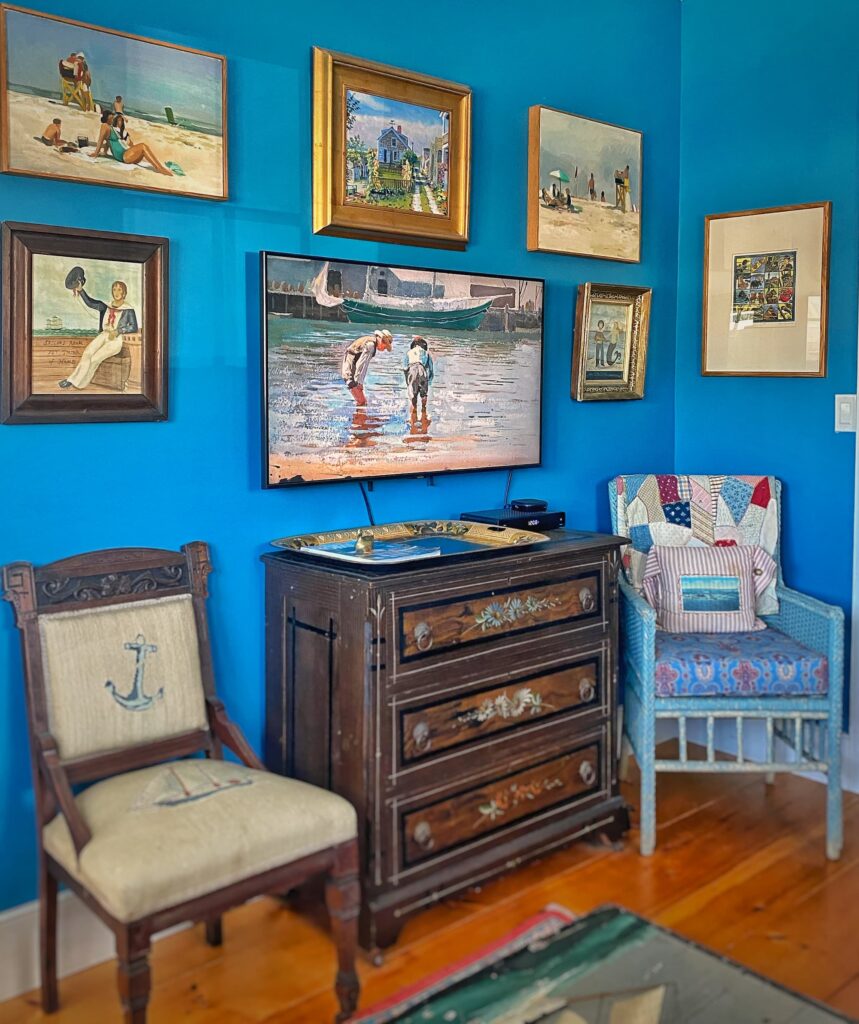
This grouping in the little den is a casual symmetrical arrangement around the tv.
These are all pieces we brought with us from Maryland, so it is comforting and familiar to have them here in Maine.
We do not have one of those fancy frame televisions. But you can easily get a similar look on your (much cheaper) smart tv!
Just search for “tv art” in YouTube. I narrowed my search to “coastal ” and “beach” to get this image.
Go Big or Go Home
Sometimes just one piece of artwork is all you need.
And sometimes you just have to go big or go home.
Trial and Error
It took me a while to figure out what I wanted to hang on the long wall above the sofa in the living room. I tried two different mirrors. I thought it would be cool to see a reflection of the view out the windows on the wall.
But mirrors can be tricky. The reflection can be interesting, but it can also be something you don’t want to highlight — like a ceiling or a big dark window at night. Or yourself. That might be useful in a bathroom, but I don’t want to look at myself in the living room. Maybe that is just me…
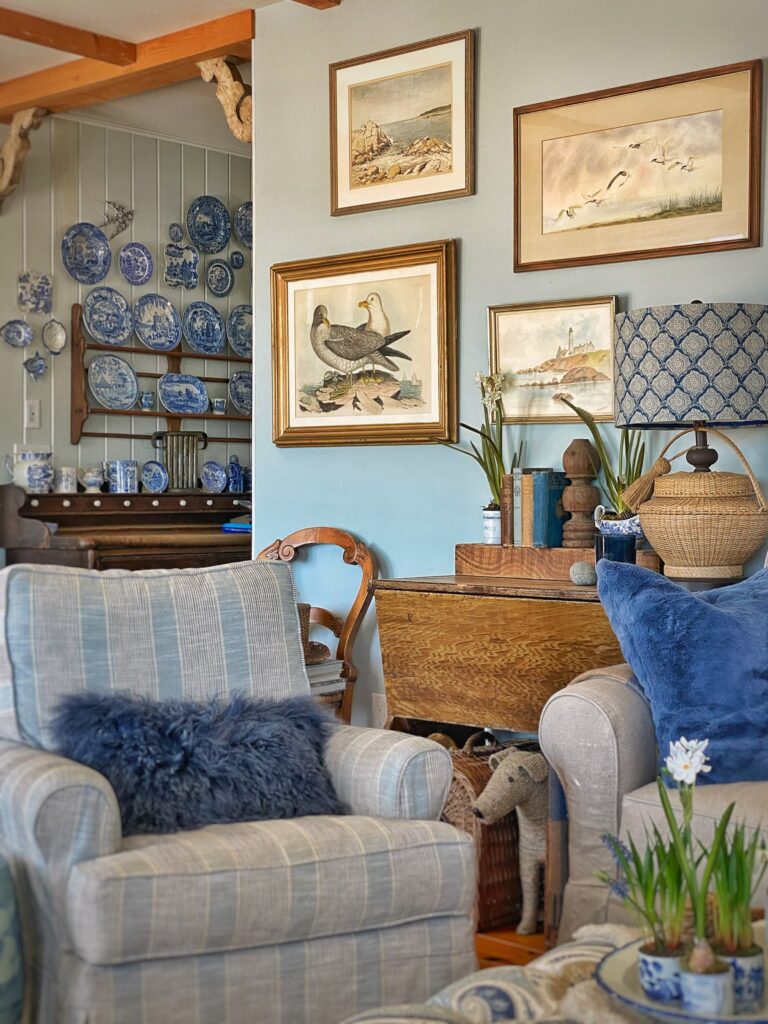
Gradually a seagull theme started to develop in the living room when I added a collection of framed antique seagull engravings hung in a symmetrical arrangement on either side of the big waterside windows.
I had long been enamored with the gallery walls made up of reproduction prints of 17th century Swedish ornothologist Olof’ Rudbeck’s works from Museum Outlets. I fiddled with various arrangements using tiny slips of paper for a while. But they didn’t feel right for this space.
The Solution
And that is when I decided that there were enough wall arrangements of small artwork in the room, and what I needed was a single large piece of art. And I mean really large!
This is how Godzilla, the lesser black-backed gull who ate my living room, came to reside with us. When I stand down by the water and look back at the house, I can see him.
He might even be visible from across the harbor.
While that might be a slight exaggeration, he does measure a hefty 57″X42″.
You can order this print in smaller sizes, framed or unframed. I had mine framed locally to coordinate with other artwork in the room.
Hanging Solo
Of course a piece of art does not need to be oversized to hang solo. It depends on the space you have and the look you are going for.
Sometimes a single small piece of art can speak loudly!
How To Hang Art Work
There are many ways to hang art.
Sometimes you can just eyeball it.
Other times, particularly when hanging a symmetrical arrangement, careful measurements are required.
It all depends on how “perfect” you want it to be and whether or not you mind extra nail holes in your walls.
Speaking of which — I am an old fashioned metal-picture-hanger gal. Sometimes if something is small and light, I will use just a nail.
I know there are people who swear by command strips. My general experience, though, is that they either don’t stick well enough (leading to possible breakage) or they stick too well (leading to wall damage when you try to remove them).
Maybe it is operator error on my part, but I just don’t trust them.
Does it come as a surprise to you that I usually fall into the “measure carefully perfectionist” group?
Here are some methods I use to hang things on the wall.
Careful measurements
As I said, this is usually how I do it — particularly when it is a symmetrical arrangement or a single piece of art.
I generally like single pieces to hang in the center of the wall, and of course not too high or low. If it is not placed correctly, it will scream at me until I fix it.
And as my commentator friend pointed out to me — pieces in a symmetrical arrangement should be level and equidistant.
Using Templates
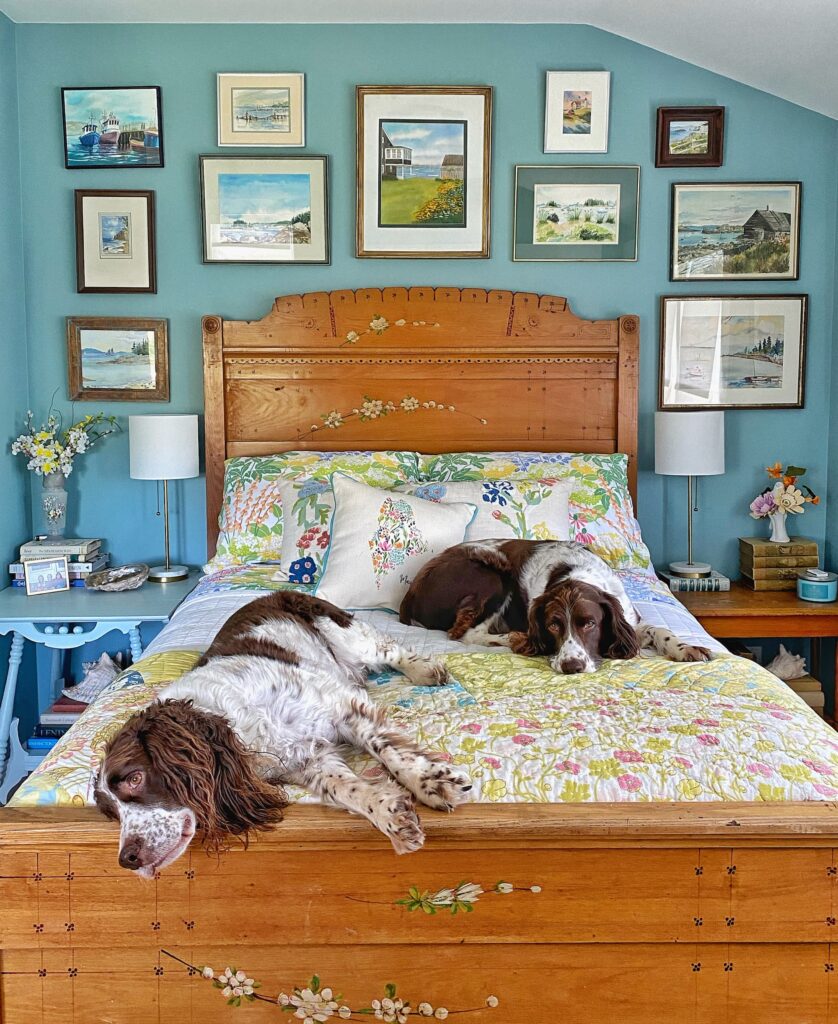
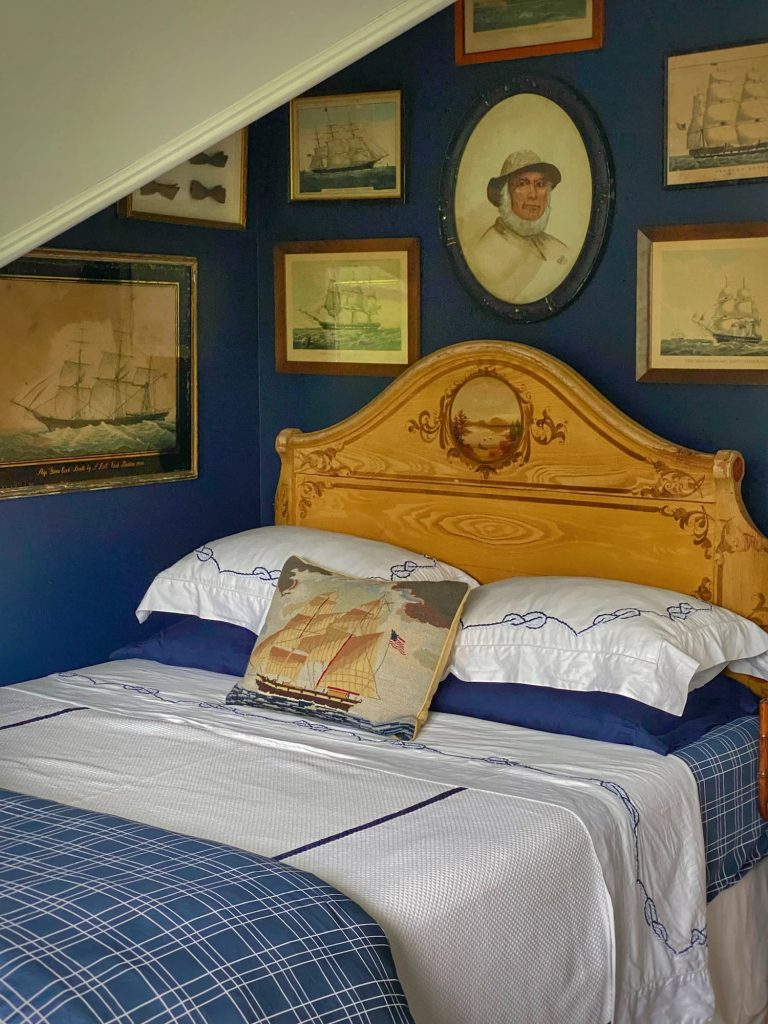
The largest gallery wall I have done is this one over the bed in the waterside guest room.
I spent several months combing antiques stores for these original watercolors of coastal scenes, purposely looking for pieces that were different sizes and in a variety of frames.
My intention was for the collection to look like it had been added to gradually over the years. Some of the artwork is older and some more contemporary. I didn’t pay much more than $50 for any piece.
When it came to hanging, since the frames were all different sizes, I cut out templates of each piece from craft paper. I folded the templates in half so that I could clearly see the center and marked the top of the hanging wire on each.
Then I started playing with the layout, using painters tape to attach them to the wall.
When I was satisfied with the arrangement, I knew exactly where to place the picture hanger from the mark I had made on the template earlier. I could hammer the nail right through the paper!
It was still a tricky process, but I don’t know how I would have done it without the templates.
I have also used the paper template method for smaller arrangements. It is an extra step, but it makes for good results. (And no ill-hung pictures screaming at me!)
Laying Out on a flat surface
For some arrangements, especially when the items are different sizes and shapes, it helps to lay the arrangement out on a flat surface. You can then replicate the layout on the wall.
I will talk more about this method next week in part two of this series!
Just Eyeball It
I know there are those who like to just eyeball it when they hang pictures, but that is not me.
Even when I am not carefully measuring out the distance between each piece, I still like hold each one up to “eyeball” its location and then mark it on the wall. I then measure where to place the hanger from that mark.
Hats off to you who can hang pictures without measuring at all!
Pulling It All Together

Original art, antique and vintage pieces, and a modern print.
Small, medium, and (extra) large sizes.
Hanging solo, in a casual group, or a formal gallery wall.
You can see how it all comes together in our living room to help tell the unique story of our home here on the coast of Maine.
There are even some added elements — the topic of next week’s blog post: displaying non-art pieces on your walls!
This is when we will get really creative!
See you then!
Thanks for hanging out with me here today!

Questions, comments, or just want to say hello?
I’m always happy to hear from you.

Wonderful post! I have always loved all of your wall decor! You have some amazing treasures 💙
Thank you, Karen! I can’t wait to share some of my more unusual wall decor next week!
Very informative article! I love your house and how everything is displayed! I also love the blue paint color in your living room…could you share what the color/brand is please? Thank you! Kathy
Hi Kathy! Thanks for reading! The paint color is Benjamin Moore Brittany Blue. I wrote a whole blog post on the blues I used downstairs. You should check it out!
If you change grouping, don’t you end up with many nails showing?
Laugh at me, when I get it on the wall, it is staying right there. Ha! Ha!
Amazon had every nice large, large, I thimk, blue heroin art.
My favorite are your beauty from Maryland
Thanks for an informative.post!
Ha! I try not to stress over the nail holes. If they get really bad, it is easy to touch them up with a bit of spackle and paint! Mostly, though, they don’t show.
Well obviously there was a dog that had no worries about falling objects. lolol I have never seen or even heard of sailors valentines. They look so beautiful and intricate. I’m always happy to see my favorite photo – the fireplace surround in the primary bedroom.
Hi Lynda! The bedroom “fireplace” took a while to evolve, but I too love how it turned out! Such a great focal point!
I totally agree with everything you wrote, except the go big or go home. We actually went big and went home. We were on a driving vacation (fortunately in our station wagon) and were having dinner in a restaurant in Memphis. The art on the walls was for sale. We couldn’t take our eyes off of this one very large painting of stars falling in a blue sky. We finally decided to ask about it and whether it could be sent home while we finished our vacation. The answer was no, so we put it in the back of our car and took it with us on the rest of our vacation. It now hangs over the loveseat in our living room.
So, like me, you went big! What a statement it makes too!
I too am one to have many treasures on my walls, fun to see all your rooms. Most of all, thank you for mentioning the youtube tv art!! I LOVE it! I chose the vintage landscapes which goes so perfectly in our 1887 Victorian farmhousr.
Yay! I am so glad this was useful for you! Fun, right?!
This is a fun and helpful post, Molly. Thank you! My biggest challenge is getting over my fear of hanging things on wallpapered walls.
It is always kind of hard to put a hole in any surface, right? The good thing about wallpaper, though, is that the holes are usually hidden by the pattern! Hang away!!
As a huge admirer of your wall art displays, I loved with post and all your tips. Wall art is something I struggle with and three years after moving into our renovated home I’m still grappling more than a few empty walls. Looking forward to part 2! xo
Thank you, Juliet! I have always been fearless when it comes to hanging things on the wall! For me it is such fun creative expression! Next week’s post should be fun!
I so look forward to your Saturday blog post. They are always informative and useful. Who knew you could get TV art from youtube…not me! Thanks for that tidbit. I am with you about command hooks. They failed me once and never again. Looking forward to next week’s “how to” blog.
Hi Julie! I am so glad you enjoy my posts. Thank you for always reading them! Next week’s post should be fun!
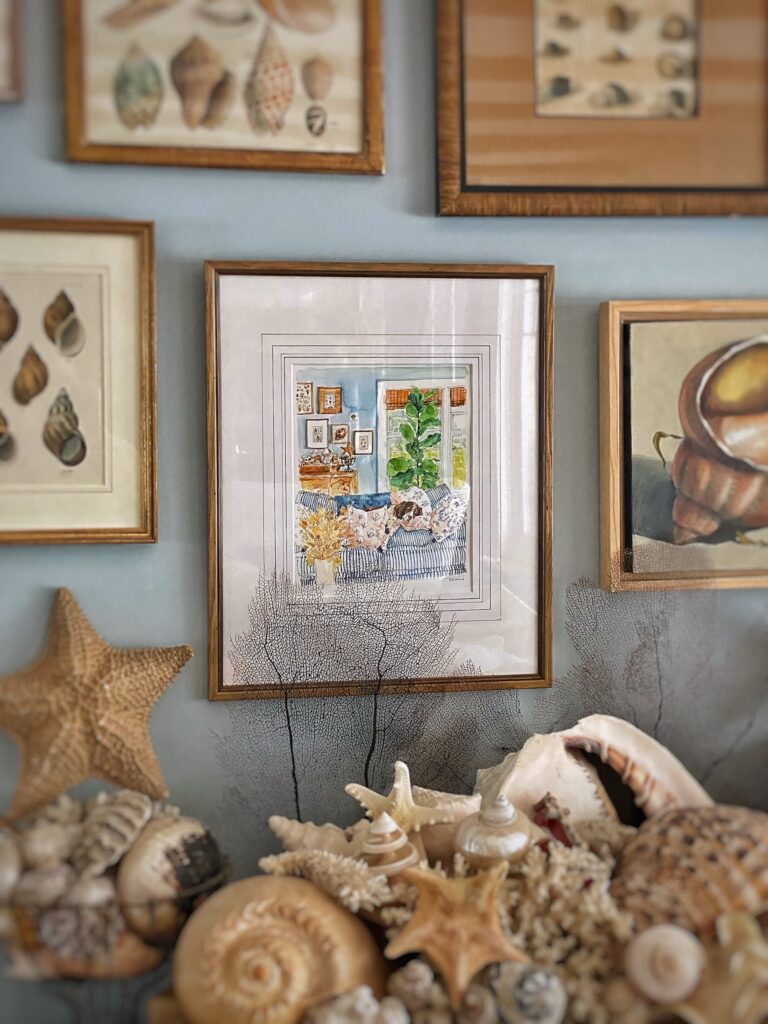
love this blog on your wall hangings. i love your asymeyrical gallery walls and all the different types of materials you hang. steve and i like to buy things from our trips so looking around we remember all the things we have done together. by the way i love that you added a watercolor of your dog (cant tell if it is cisco or maddie) on the couch in front of the shell gallery wall. that is so whimsical! cant wait for part 2!
You have such great arwork in your home, Amy! And I love how you cover the walls with it! Yes, that is a watercolor of Maddie on the loveseat in front of the wall arrangement! I love that now it is a part the arrangement!
Great article! Your wall art and the way you arrange it is so inspiring! I love the asymmetrical look especially! I have a difficult time with gallery walls for some reason. I collected the art work for my son’s room redo and completely thought I was going to arrange them in an asymmetrical arrangement on one wall in his room but when it came down to finally hanging them I hung them all singally in different spots on the walls. I like the final look but was a bit disappointed that I didn’t do a gallery wall. I’ve got to try again in another room or add around some of the artwork already hung. I’m goung to persevere until I do one. Your article really encourages me to keep trying.
You’ve got this, Nori! I know you can create a wonderful wall arrangement!
Love this post Molly as I have been thinking of changing things up in our den/office.
Looking forward to part 2.
I am so happy you enjoyed this post! Have fun with your new arrangement in the den/office!
Good post. We favor the lay it on the floor and held it up before using nails No command strips for us! Our srt is primarily the collected art from the many places we have lived and from our travels. Plus -photography . ASnd few pieces of art wpork from my two daughters One is now an artist.
Thank you! I love art collected on travels! And especially art created by family members! Lucky you!
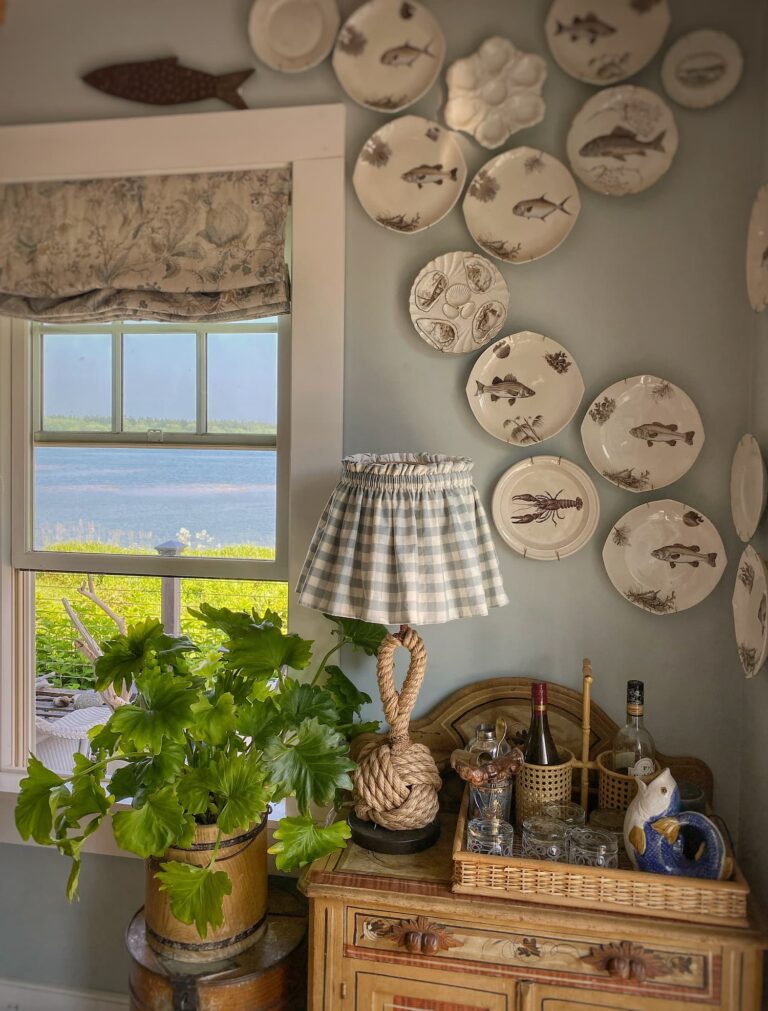
Your wall collections always look so nice and thoughtfully planned. I love your fish in the kitchen and the plates in your dining room. Happy Sunday Molly.
Thanks, Ann! I will be sharing both of those in this week’s post! I always love your arrangements too!
Molly, your art and gallery walls look fab! I am working on putting together a couple in my own home. Such a fun project to do!
Thanks, Kim! Yes, it is so fun to collect and then arrange the artwork!
Molly
You have so many beautiful collections and you display them with such style. Thanks for sharing your talents with us.
Thank you, Rachel! I can say the same about you!
Love all of the tips in here, especially for someone like me who is…not good…at hanging things. I’ve always admired your ability to get creative with non-art hanging pieces, so looking forward to this week’s part 2 post! Also love the shoutout to Leah + Adam’s gallery wall
Thanks, honey! I am happy to help you anytime! I will be sharing your cheese/wooden board wall on this week’s blog post! Have to see what photos I have of it. I might ask you for one!
Molly, Took me a while to read this, but I didn’t want to hurry through as I love all your tips, ideas and seeing your art and the stories behind them!
I also love a gallery wall! It took me a while to pull together the one above my sofa and of course the measuring..I do it all on the floor first.
Can’t wait to read the next one with ideas for hanging other items!
Fantastic and inspiring post!
xo
Love your home,filled with the things you love. I noticed the sailors valentines.They are so amazing.There is a woman who lives in Friendship Maine,and Has a shop in Rockland,AntiquesEtcetera who makes them,they are amazing also .Her name is Sherry.
Thank you, Martha! Yes, Antiques Etcetera is one of my favorite haunts! I didn’t know she makes sailors valentines!
Love how you have surrounded yourself with such beautiful things,I especially loved the sailors valentines,they tell such a story.There is a woman who owns an antique shop in Rockland named Antiques etcetera who makes them.They are lovely also.Her name is Sherry.
Hi Martha! Thank you! Yes, the sailors valentines truly are special. I love Antiques Etcetera! I have gotten so many fun finds there, but never a sailors valentine.
Hi, Molly, I am reading backwards. I read part 2 and then Part 1. I love all your displays of your lovely treasures and have had the pleasure to see them in person and also see their evolution. You have a great eye! Your blog posts are very inspiring and make decorating seem approachable for everyone. It was fun seeing pictures from Zoe and Leah’s homes, too, and see that they both have inherited your gifts of collecting and displaying beautiful items that speak to them. I love the colors in Leah’s home and the creative display of the storybook pinwheels. Very sweet and meaningful, especially since they came from her shower.
Great and helpful blogs. I have a few “displays” but this inspires me to arrange the ones that have been in my mind but that I have put off.
Hi Jill! Thanks for reading my blog posts! Decorating IS approachable. You have filled your home with things that have meaning to you and that is the most important thing! I would definitely hang those things on your wall!
All so beautiful Molly!! As always you inspire me so much!!
Thank you, Kristin! Likewise!
Hi Molly…Do you remember the source for the seagull print on the wall behind the sofa? Also, I have been looking for vintage lithographs of gull and other native shore birds of Maryland and can only find VERY small ones that have been taken from antique books. Did you have your other prints enlarged from old originals or are they reproductions?
Thanks,
Tracey…from the western shore of the Chesapeake Bay
Hi Tracey! The huge seagull print is from Museum Outlets. (It also comes in smaller sizes!) There is a link to the website in my blog post. My prints are original vintage/antique lithographs from books. They are approximately 9X12 and then the frame makes them a little larger. I got some of them from a local antiques show and then ordered more from Etsy. They aren’t necessarily birds local to Maine, but they are all varieties of seagulls. Good luck on your search! Let me know if you have other questions!